• lifestyle,  mac os x,  macos,  web os

    Roast My Spotlight Settings

    A couple of recent segments on Relay FM’s Connected podcast titled Roast My Menu Bar and Roast My Dock had gotten me thinking about a weird way that I like to use Spotlight Search.

    The long standing feature of macOS is described by Apple this way:

    “Spotlight can help you quickly find apps, documents, and other files on your Mac. With Siri Suggestions, you can also get the latest news, sports scores, weather conditions, and more. Spotlight can even perform calculations and conversions for you.”

    Spotlight was added to Mac OS X 10.4 Tiger back in 2005. Back then, I was not a heavy user of of the tool. I would occasionally use it when I misfiled a document and wanted to quickly try and search for it.

    Source: Wikipedia

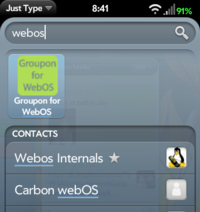
    Oddly, the tool that I did end up using, a lot, was a feature of Palm’s Web OS called Universal Search (Web OS 1.x), and its successor feature, Just Type (Web OS 2.x and 3.x). With Web OS, you would just start typing what you were looking for and the Palm Pre would look it up for you.

    Web OS 2.x and 3.x Just Type search bar on a Palm Pre, Source: WebOSNation
    Web OS Just Type search results, Source: WebOSNation

    When I moved from the Palm Pre to the iPhone 4S with iOS 5 in 2011, the Universal Search muscle memory transferred over to Spotlight Search.

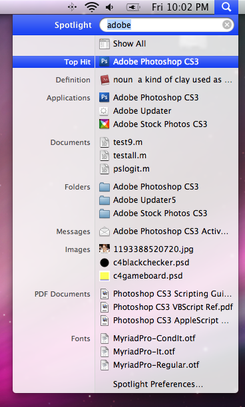
    While Mac OS X Spotlight and Web OS Universal Search were meant to search for all sorts of things, both on the device and across the Internet, I fell into a pattern of using both technologies as a quick way to launch applications. First on my Web OS Palm Pre and then on my Macs with Spotlight.

    On the Mac, Spotlight had gone from being a skinny search box in the upper right of the screen to a fully centered search tool that lives at the center of the Mac’s display. As the types of content that Spotlight could search, the search results became longer and longer. But for me, Searchlight would be considered an application launcher first and foremost as a quick way to launch applications without having to take my hands of the keyboard.

    Spotlight Search in macOS Big Sur 11.x

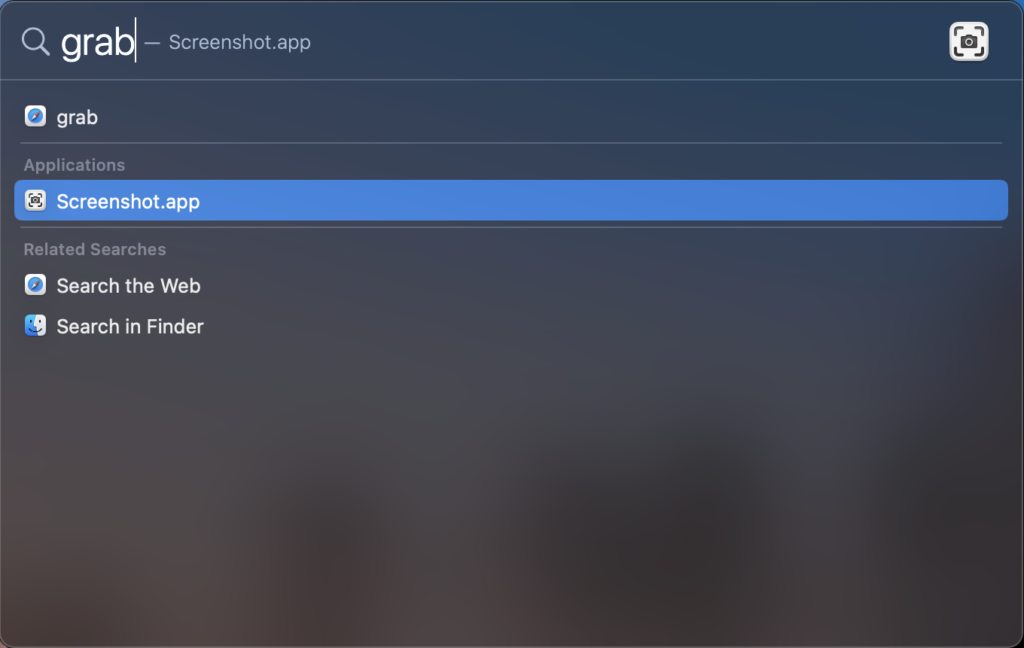
    In recent versions of Mac OS, now known as macOS, I found myself fighting with Spotlight Search for some system apps, like Snapshot, which also has an alias of ‘grab’. (The ‘grab’ alias also works in Microsoft Windows 10 and 11.) I’d want to quickly ‘grab’ a screen capture, pop open Spotlight with the keyboard shortcut Command + Space and type in grab. Rather than getting the Screenshot.app, Spotlight would often put a reference to something ont the web as the fist hit in the list. In past versions of Mac OS, applications would show up first in the list, but that wasn’t always the case in late version of macOS 10.x and Big Sur (11.x).

    Spotlight Settings: Uncheck to declutter search results

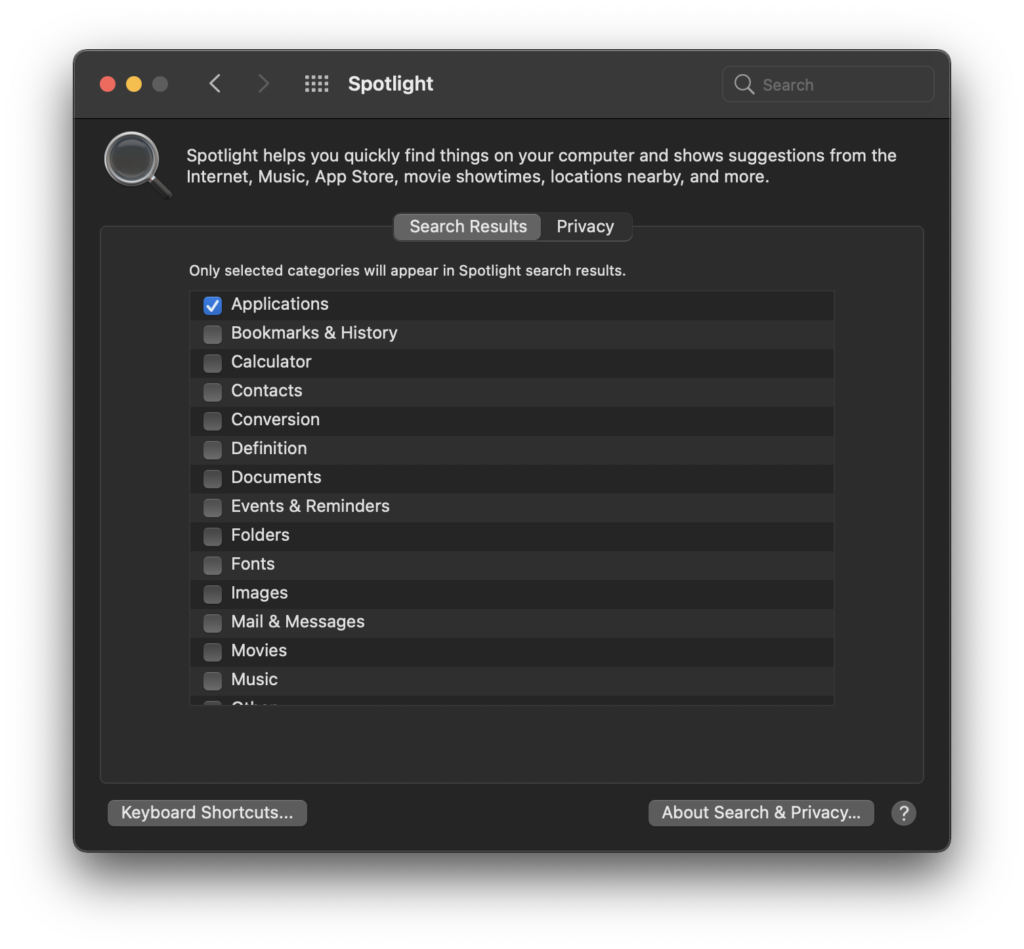
    In a recent fit of the machine is working against me rather than helping me, I opened the the Big Sur Settings app, clicked on the Spotlight preferences control panel and unchecked everything in the list except Applications and System Preferences. I may turn on the option to search for definitions in the Dictionary app, but for now, that option remains off.

    So roast my Spotlight usage and preference settings. But for me, this is one time where I chose to customize my Mac to work for me rather than against me.

    And I’m happier for it.

  • apple,  g3,  powerbook,  restoration,  vintage

    PowerBook G3 Wallstreet Technical Resources

    Apple Service Source PowerBook G3 Guide, pg 11

    The other day I mentioned that I was getting started one last time to try to get my 1998 PowerBook G3 up and running again. This is the third time it has failed after having replaced the Sound/AC In board (820-0986-B) and having to replace the 4GB ATA IDE OEM hard disk (and the keyboard, because I’m a klutz).

    The PowerBook G3-Series

    It is important when planning your repair of a PowerBook G3 that there are multiple version of this laptop. It says so right on the bottom of the laptop – “Macintosh PowerBook G3 Series“.

    Identifying the specific version of PowerBook G3 can be a bit tricky.

    My particular PowerBook G3 is identified as being the September 1998 edition, using the code names PDQ (Pretty Damn Quick), or the one I knew it by, “Wallstreet”. According to EveryMac.com, PDQ was a refinement to the Wallstreet model to address inventory problems that Apple was grappling with at the time. Looking at the Wikipedia page for the PowerBook G3 Series, you quickly realize that there are three generations of PowerBook G3: The original Kanga version (1997) based on the earlier PowerBook 3400c, the Wallstreet models (May 1998 and September 1998), Lombard (1999) and the final revision known as Pismo (2000). Technical distinctions aside, I still plan on regerring to my particular unit as ‘Wallstreet’, since it is the style the PDQ is a descendant of.

    When verifying which vintage Mac I am working with, I like to use the excellent MacTracker application for macOS, iOS/iPadOS and the EveryMac.com website.

    Technical Resources

    Now that we can identify the particular model of Macintosh, we will need to refer to technical documentation to get a specs readout and learn how to disassemble the computer for repair.

    I like to start with the above mentioned app and website, but I do also like to look up the technical specifications of the PowerBook G3 in the Apple KB support archive.

    Another resource that I like to look up is the Apple Service Source documentation. AppleRepairManauls.com has a wide selection of technical information about Apple hardware, including the PowerBook G3 M4753 Service Source manual.

    If you are more of the get straight to what I need to know tear down kind of person, PowerbookMedic.com and iFixIt.com have Wallstreet disassembly directions. To help diagnose the problem with your Wallstreet G3, iFixIt.com has put together a troubleshooting checklist.

    Both vendors offer spare parts sales. PowerBookMedic.com also offers send in repair services, however, when dealing with computers that are over 20 years old, finding a good source of reliable replacement parts is becoming difficult to source.

    Mac OS 8 Software Disc

    Once the hardware is repaired, you may need to reinstall Mac OS. This is something that I like to do with all of my restored systems. At the time of this post, I was able to track down a restore CD on MacintoshGarden.org for the entire PowerBook G3 Series of laptops. You will need to burn the disk image .dmg file on to a physical CD before using it.

  • apple,  g3,  powerbook,  restoration,  vintage

    PowerBook G3 Rebuild

    Some time ago, I purchased a used PowerBook G3 Wallstreet laptop. I had used one at work in the early 2000s and wanted to add one to my vintage collection.

    Being over 16 years old when I purchased it, needing some work to getting it running properly again was to be expected. Shortly after purchasing it, the Sound/AC board had gone bad. I was able to source a working part and a repair guide from PowerBookMedic.com.

    G3 motherboard in chassis with sound/AC in board (top) and charger board (bottom).

    More time passed and the stock 4GB ATA IDE hard disk failed. I sourced another OEM part and installed it. While reassembling the G3, I accidentally broke one of the clips for the spacebar takes to a stupid mistake. Another OEM part later, the PowerBook G3 was put back together. Except, after replacing the disk drive and the keyboard, the laptop refused to power on again. And, so, the 1998 PowerBook G3 sat. And sat. And sat. Until today.

    Today, I decided to stip the unit down and look for the reason why my troublesome PowerBook refused to boot. Using the repair guide, I disassembled the 22-year old computer once again. As I removed components from the chassis there were no obvious defects. The main Lithium Ion battery pack was not swollen and did not show signs of leakage. Likewise, the motherboard, the sound/AC In board, and the charger board did not appear to have an erupted, bulging, or leaking electronic capacitors. Aside from a few soldering jobs on my eMate and Original Newton MessagePad, my knowledge of electronics is fairly limited. Still, nothing appears to be out of order.

    System components: modem (top), processor card with PowerPC CPU and RAM (center left), Apple 4GB ATA disk (center right), charger board (bottom left) and the sound/AC in board (bottom right)

    Having torn down the PowerBook and not finding any obvious defects, I am going to attempt one more round of repairs on my G3 laptop. My plan this time is to source another sound/AC In board, since it was the cause of the first failure. After having had to replace the power supply during my Power Macintosh G4 Quicksilver rebuild, I also plan on sourcing a replacement charger board.

    Since this will likely be the last time I will attempt to service my old guy, I am also thinking about options for replacing the battery pack. It will eventually leak, and I don’t want to have to deal with electrolyte damage. The G3-series PowerBooks were designed to accept two battery packs – one in each of the two module bays. I would ideally like to keep the 20x CD-ROM module in the right bay and loading in an Apple floppy disk drive or a third-party Iomega Zip Drive in the in the left module bay. As a last resort, I will look for a period accurate spacer that might be available.

    I also plan on looking into replacing the OEM 4GB ATA IDE hard disk with a 2.5″ SSD solution. I used a similar 3.5″ SATA SSD to IDE conversion kit in the aforementioned G4 Quicksilver rebuild project. It really speed up machine performance and I am hoping to do the same with the G3 Wallstreet if I can find a bridge accessory that can fit into the 2.5″ drive tray.

    It would be nice to rebuild and upgrade my G3 Wallstreet laptop. However, given it’s age and previous failures, for me, this rebuild attempt will be more about the journey than the end result. That said, if I have learned anything from NASA’s Hubble Space Telescope, launched in April 1990 and still making scientific observations today, it’s that you shouldn’t count out old hardware as long as someone is still willing to service it.

  • mac os x,  macintosh,  security,  vintage

    Mac OS X 10.4 Tiger’s Java Updates

    Running Mac OS X Tiger? You’ll have some Java updates to apply!

    When restoring vintage Macs, I like to upgrade Mac OS / Mac OS X / OS X to the latest release to make sure that I have the very latest software on my gear. For my latest project, I am installing Mac OS X 10.4 Tiger and all of the available updates from DVD and Software Update. Looks likes Java has had quite a few updates.

  • apple,  emulator,  newton

    Newton OS 1.0 Emulator In Your Browser

    Booting up a Newton in a browser

    I have been talking about the Apple Newton a lot lately. If you want to skip all of the soldering and just take a stroll down memory late, Pablo Marx has created a web-based Newton OS 1.0 browser-based emulator on the web called Leibniz.

    Leibniz lets you relive a stock Newton OS 1.0 playing with the software that comes bundled in ROM. The mouse pointer acts as the stylus for touch screen input. If you mouse to handwriting is as bad as mine, you can bring up the on screen keyboard and use the mouse to peck out typewritten input.

    Experience the thrill of Notes in a vNewton in your browser

    If you are so inclined, you can also download a version of the Leibniz emulator for your modern Intel or Apple Silicon Macintosh. To legally use an emulator like Leibniz, you need to dump a copy of the ROM chip from a Newton you already own. As many iin the Newton community have found, dumping your Newton ROM can be a bit of a pain, so Pablo Marx links to several ready-to-go ROM images for you.

  • apple,  messagepad,  newton,  vintage

    Patch Newton OS 1.0 to Use the Getting Started Card

    An Original Newton MessagePad with the Getting Started PC Card

    Over the last year, I have gotten into retro computing. More specifically, restoring vintage computers to keep myself busy. Since the start of 2020, I have restored a 2001 Power Macintosh G4 Quicksilver, a 1997 eMate 300 notebook, and a 1993 Original Newton MessagePad (OMP).

    When I got my OMP, it was sold as-is, broken, and incomplete. To get the OMP working again, I just needed to put in a few hours of research, another couple of hours for electronics soldering work, and a pair of inexpensive electrolytic capacitors. I still have lots of room for improvement with my soldering skills, but as far as my OMP was concerned, the hard part was behind me. Now, it was time to find the missing pieces for my little green guy.

    Front and back of Apple’s 1993 Getting Started Newton Card

    One of the accessories that I have been searching for is an Apple Getting Started program card. After several months of searching eBay, I finally won an auction for one of these cards. These black and red credit card sized PCMCIA cards, PC Cards for short, include a few little programs that new Newton owners use can use to get to know their device better. For example, on the 1993 version of the card that I have, are the Handwriting Instructor (Instructor), Newton Tour (Tour), and CalliGrapher (Game) applications. When my card arrived, I early loaded it into my OMP. I was created with an error message that stated that the card couldn’t be read and prompted me to erase the card.

    I was not expecting this error message.

    I also tried the card in my other Newtons and my eMate and got similar results. I was starting to think that the card might be bad or the previous owner might have tried to use it for something else. Still, this is a ROM card, which can only be read, so I started to thing that my recently refurbished OMP, specifically, it’s card reader, might have been bad. So I started searching the Internet for clues.

    One real possibility was that I was jut holding it wrong 1. I started to get the hang of Newton OS 2.x and the MessasgePad 2×00, but I am less familiar with Newton OS 1.x and the 100-series MessagePads.

    I found a NewtonTalk.net archive that lead me to a blog post by Pawel over on his AppleNewton.co.uk blog. Pawel was having a an issue where his cards weren’t being recognized by his OMP either. Thankfully for Pawel, his solution was an easy one. Unlike the MessagePad 2×00 and eMate devices, the OMP requires that the card lock switch be re-engaged before the card can be read. But, that wasn’t my problem because I had inserted the card and engaged the card lock. So, what was my problem then?

    The OMP had a PC card lock switch in addition to the eject button.

    Fortunately, the solution to my problem was also straight forward, if not slightly more difficult to implement than flipping a slider on the OMP.

    Early Newton devices, including the OMP and it’s 100-series siblings have volatile memory in them. Unlike or iPhones or later model Newtons, when the batteries deplete, the contents of memory are lost on these old devices. To save your data from being lost, there are three ways to protect your data. The first is a backup coin cell battery in the Newton that can preserve the contents of memory while you are changing out the main battery. You can also plug-in the Newton to achieve the same effect if you don’t have a coin cell battery installed. A bold move, but some people like living life on the edge. Secondly, you can back up the contents of the Newton to a backup PC card. These cards were available from Apple and third-parities. The third option is to use the Newton Backup Utility (NBU) to save the contents of the Newton’s memory to your Classic Mac OS or Windows PC. All of this is to say that my OMP had lost the contents of RAM memory long before I received it. As a result, when I was able to finally start it up again, it had reverted to the software that was loaded into it’s ROM, which included Newton OS 1.00.

    Turning to the good folks on the NewtonTalk list lead me to the answer that Newton OS 1.00 is just too old for the Getting Started card that was included with the OMP. Matej pointed me to an old Newton FAQ that was written back in 1995 by Jean-Christophe Bousson that documented the fact that Newton OS 1.01 or later is needed to use the Getting Started card. The Newton OS 1.05 and 1.11 update packages are available for download from the United Newton Network Archive (UNNA).

    The Getting Started card needs Newton OS 1.01 or later to work.

    With the answer in hand, I turned my attention to the task of actually installing Newton 1.01. Like a fool, I read the release notes for the Newton OS 1.05 update. It specifically mentioned that users should backup your Newton before installing the update as installing any of the 1.0x updates erases your Newton. Except, I couldn’t get my OMP to backup to any of my computers. Not my vintage Power Mac G4 Quicksilver; not my iMac; and not my M1 MacBook Pro. It also didn’t matter which tool I used. Newton Connection Kit (NCK), Newton Connection Utilities (NCU), macOS Newton Connection (NCX). I decided to give up on the backup step since I didn’t have any data to save. I put NCX into Newton 1 install mode and the 1.05 update package immediately transferred to the OMP. From there, I was able to run the update without issue. Once the upgrade to Newton OS 1.05 was complete, when I loaded the Getting Started PC card into my OMP, everything worked as expected.

  • ios,  iphone,  troubleshooting

    Force Reboot an iPhone

    My Dad has this knack for getting himself into trouble with his computer equipment. iPhones. Macs. iPads. You name it. He can find some crazy edge case that will send you searching for answers.

    To be fair, this past Friday’s problem wasn’t really something that he did wrong. He sent me a text and followed up with a call to tell me that he could’t use his iPhone 12 Pro Max. It wasn’t registering any touch input.

    Here’s the problem, he knew to reboot his iPhone by holding down the hardware Volume Up and Power buttons, but had no way to use the Slide to Power Off option.

    On ‘old style’ iPhones, like the iPhone 6/7/8-series, you can force a reboot by pressing and holding the Home button and the Power button together for a few seconds.

    That doesn’t work on an iPhone with Face ID.

    After several attempts at searching the Internet, I finally found the Apple manual page for performing a forced restart on an iPhone. The procedure varies by model depending on whether or not a Home button is present. To force restart an iPhone that has Face ID, you need to the the following:

    Press and quickly release the volume up button, press and quickly release the volume down button, then press and hold the side button. When the Apple logo appears, release the button.

    Source: Apple, Inc.

    I had to try this a few times to get the timing right, but, as ‘They’ say, the third time was the charm. Just make sure you aren’t on a phone call when you try it.

    Source: iPhone User Guide – Force Restart iPhone

  • apple,  messagepad,  newton,  vintage

    Restoring a Newton MessagePad to Working Order

    My restored Apple Newton MessagePad (1993)

    I recently picked up an as-is Apple Newton MessagePad on eBay. I mostly wanted it for the accessories: a pair of third-party game PC cards, a 9W AC adapter, and the original Apple Mac OS (Classic) and Windows 3.5-inch floppy disks.

    When I got the Newton, I realized that it powered on, but there was no sound and the display was on but not displaying an image. As it turns out, this is a common problem with vintage Newtons and can be fixed with just a couple of new capacitors.

    To fix the original Newton MessagePad (OMP), also known as the H1000, you need a PH00 Philips head screwdriver, a spudger, a soldering iron and a small amount of solder, 1x 100µF 16V capacitor, and 1x 3.3µF 50V capacitor. I used the capacitors from the OCR 24Value 500pcs Electrolytic Capacitor Assortment Box Kit I purchased from Amazon.

    I don’t have any formal electronics training, so I relied on Colin’s This Does Not Compute video, Fixing a Common (and Inevitable) Apple Newton Problem as a general overview of the work that needed to be done. Once I had a basic idea of the repair job, I used EkriirkE’s Restoring/Repairing an Original Apple Newton MessagePad 100 (OMP H1000), start-to-finish video as a detailed repair guide.

    I hope that if you come across a Newton OMP / H1000 in a similar condition as mine, that you can use this information and repair yours also.

  • apple,  classic mac os,  emate,  newton

    Connecting a Newton to a Power Mac Running Mac OS 9

    Newton Connection Utilities v1.0 for Classic Mac OS 9

    This post in one of a series of posts that I am writing for retro tech and vintage Apple enthusiasts on how to use your Apple Newton MessasgePad or eMate in 2021. The collected information from these posts can be found on the SPF Newton page.

    One of the things that I have been wanting to do with my Newton OS devices, and my newfound interest in them was connect them to a vintage Macintosh using the software that shipped with them. For me, that meant getting my Newton MessagePad 2000, 2100, and eMate 300 connected to a Power Macintosh G4 Quicksilver using an Apple mini DIN 8 serial cable. Here’s what I used to my Newton OS 2.1 devices talking to my Classic Mac OS 9.2.1 Mac.

    The first thing I needed to do was get my G4 back into working condition. That was no easy task. But the Quicksilver lacks mini DIN 8 serial ports. My next task would be to track down one of USB-to-Serial adapters that were popular accessories for Mac owners who upgraded from a beige Mac with two built in mini DIN 8 serial ports to the colorful iMac G3 or later Macintosh that only had USB-A ports.

    I ended up picking up a beige Keyspan USA-28 Twin Serial to USB-A Adapter on eBay. Keyspan was later acquired by Tripp-Lite. The adapter I purchased didn’t come with the packaging, manual, or software driver. It turned out that the Keyspan USA28-GX adapter was the far more popular model, and its drivers were much easier to find. I tried using the USA28-GX Mac OS 9 driver with my USA28 adapter and I was disappointed to find out that the USA28-GX driver installer was not backwards compatible with the USA28. Thankfully, I eventually found a copy of the Mac OS 9 and Mac OS X Keyspan USA28 drivers on the archive website MacintoshGarden.com.

    With the adapter and driver situation sorted out, I needed to get the original Newton synchronization software called Newton Connection Utilities (NCU). It is important to take a moment here and call out a difference in Newton synchronization software.

    If you have a Newton OS 2.0 or 2.1 device, like I do, you need NCU. Apple-branded Newton OS 2.x devices include the MessagePad 2000, the MessagePad 2100, and the eMate 300. If you are trying to connect the original Newton MessagePad, or any of the other Apple-branded MessagePad 100-series devices, you need to use Newton Connect Kit (NCK), which all run Newton OS 1.x.

    Normally, NCU or NCK come bundled with the MessagePad or eMate on 3.5″ floppy disks or a CD. Since my second hand MessagePad 2000 didn’t come with its software or manuals, I needed to turn to Internet archives to find the installers I needed for Mac OS 9. Both NCU and NCK, as well as the Newton Package Installer and Newton Backup utilities, can be found on the United Network of Newton Archives (UNNA) repository since Apple removed the downloads from their website a long time ago.

    Once you have your adapter driver and connection software sorted, the last thing you will need is a mini DIN 8 Male to mini DIN 8 Male cable and a Newton Interconnect Adapter if you are using a MessagePad 2000 or 2100.

    To initiate the connection between the Newton and the Mac:

    1. Plug in the USB-A to mini DIN 8 seral adapter
    2. Plug in one end of the mini DIN 8 serial cable into the port 1 on the adapter
    3. Launch NCU (Newton OS 2.x) or NCK (Newton OS 1.x)
    4. In the NCU Preferences box, I checked all of the connection types
    5. Plug in the serial cable (and Newton Interconnect adapter for MessagePad 2×00)
    6. On the MessagePad or eMate, tap the Dock icon, select Serial, and tap Connect
    Success! The Newton has connected to the Mac!

    After a few seconds, if everything is in order, the Newton OS device will connect to your Mac and display the sync tools slip on the Netwon and show a Connected status in NCU/NCK.