• archive,  linux,  mac os x,  windows

    Archiving CDs and DVDs with .ISO Files

    I wanted to start going through my Apple, Palm, and Microsoft CDs and DVDs and convert them to .ISO files for backup and archival purposes. In a way, I wanted to give back to the Internet for being able to download and use floppy disk archives of Apple II, 68k Macintosh, and Newton software.

    This post will outline the steps to create an ISO 9660 archive disc image file.

    I will be using my Mac Studio (M1 Max CPU, macOS Ventura 13.2), an Apple USB SuperDrive with an Apple USB-C to USB adapter, and the Disk Utility program.

    Here is my .ISO image file capture process:

    Step 1: Connect the SuperDrive and insert your disc.

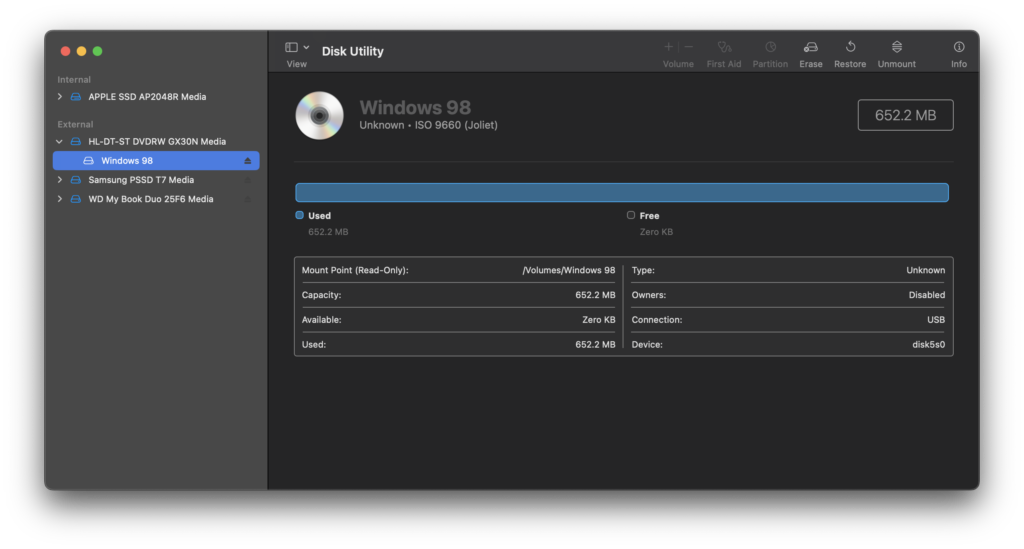
    Step 2: Launch Disk Utility and select the disc from the pane on the left.

        Step 3: In the Save As dialog box, enter a title for your .ISO file, and set Format = DVD/CD master.

        Step 4: Click the Save button.

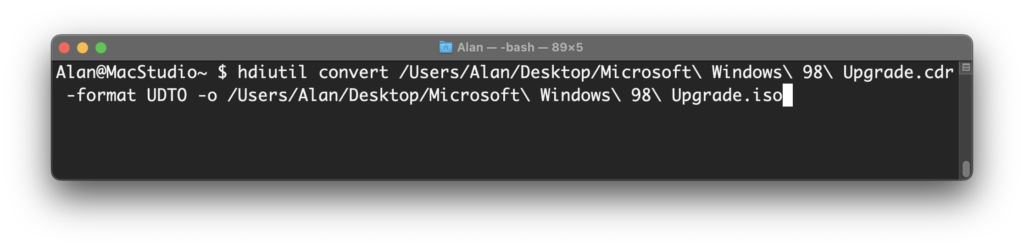
        Step 5: Open Terminal and then run the following command:

        hdiutil convert /home/username/original.cdr -format UDTO -o /home/username/destination.iso

        where /home/username/original.cdr is the Save As path and filename from Step 3 and where /home/username/destination.iso is the hdiutil .ISO file output path and filename

        Step 6: Rename the file so that .iso is the only filename extension.

        Step 7: Test out your .ISO image by mounting it on another Mac, a Windows PC, or Linux machine.

        Don’t forget to preserve any important information in companion files, such as the full software title, CD keys or serial numbers that are necessary to re-install the software, and version numbers and publication dates. Bonus points are awarded if you go the extra mile and scan the face of the CD/DVD, packing materials, or paperwork that came with the disc.

      1. el capitan,  mac os x,  macbook pro,  troubleshooting

        Reloading Mac OS X 10.11 El Capitan

        2012 MacBook Pro with an El Capitan install error

        I was recently given a 2012 MacBook Pro from a family member who asked me to wipe their data and recycle the computer.

        Erasing the hard disk was easy enough – I just connected it to a SATA to USB-A bridge box that I have and reformatted it from my Mac Studio.

        Where I ran into trouble was trying to load a clean install of Mac OS X 10.11.6 El Capitan on the MacBook Pro. I kept running into an error that read, in part:

        "OS X could not be installed on your computer. No packages were eligible for install."

        I tried a couple of variations on reformatting the disk from another MacBook Pro and a Windows 10 PC with no luck.

        With a Jan. 2017 date, my MacBook Pro happily installs El Capitan now

        It turns out that the date needs to be rolled back to 2017 to get the installer to run properly. Here’s how I fixed the problem:

        1. Boot the Mac from your install media. Make sure any network connections (Ethernet or Wi-Fi) are disconnected or disabled.
        2. When the OS X installer screen appears, click Utilities > Terminal.
        3. From the Terminal application, issue the command: date 0115124517
        4. The response from Terminal should be a string that reads something similar to: January 15 12:45:00 2017.
        5. Quit the Terminal app.
        6. Reconnect your network connection.
        7. Follow the on-screen prompts to complete your Mac OS X install.

        As you can see, the processed worked for me. The problem related to the El Capitan’s installation certificate has expired. As a result, the installer returns the error message about no eligible packages being available to install. When you disconnect the Mac’s network connections and roll back the date, you are ready to party like it’s 2017 and reinstall El Capitan.

      2. lifestyle,  mac os x,  macos,  web os

        Roast My Spotlight Settings

        A couple of recent segments on Relay FM’s Connected podcast titled Roast My Menu Bar and Roast My Dock had gotten me thinking about a weird way that I like to use Spotlight Search.

        The long standing feature of macOS is described by Apple this way:

        “Spotlight can help you quickly find apps, documents, and other files on your Mac. With Siri Suggestions, you can also get the latest news, sports scores, weather conditions, and more. Spotlight can even perform calculations and conversions for you.”

        Spotlight was added to Mac OS X 10.4 Tiger back in 2005. Back then, I was not a heavy user of of the tool. I would occasionally use it when I misfiled a document and wanted to quickly try and search for it.

        Source: Wikipedia

        Oddly, the tool that I did end up using, a lot, was a feature of Palm’s Web OS called Universal Search (Web OS 1.x), and its successor feature, Just Type (Web OS 2.x and 3.x). With Web OS, you would just start typing what you were looking for and the Palm Pre would look it up for you.

        Web OS 2.x and 3.x Just Type search bar on a Palm Pre, Source: WebOSNation
        Web OS Just Type search results, Source: WebOSNation

        When I moved from the Palm Pre to the iPhone 4S with iOS 5 in 2011, the Universal Search muscle memory transferred over to Spotlight Search.

        While Mac OS X Spotlight and Web OS Universal Search were meant to search for all sorts of things, both on the device and across the Internet, I fell into a pattern of using both technologies as a quick way to launch applications. First on my Web OS Palm Pre and then on my Macs with Spotlight.

        On the Mac, Spotlight had gone from being a skinny search box in the upper right of the screen to a fully centered search tool that lives at the center of the Mac’s display. As the types of content that Spotlight could search, the search results became longer and longer. But for me, Searchlight would be considered an application launcher first and foremost as a quick way to launch applications without having to take my hands of the keyboard.

        Spotlight Search in macOS Big Sur 11.x

        In recent versions of Mac OS, now known as macOS, I found myself fighting with Spotlight Search for some system apps, like Snapshot, which also has an alias of ‘grab’. (The ‘grab’ alias also works in Microsoft Windows 10 and 11.) I’d want to quickly ‘grab’ a screen capture, pop open Spotlight with the keyboard shortcut Command + Space and type in grab. Rather than getting the Screenshot.app, Spotlight would often put a reference to something ont the web as the fist hit in the list. In past versions of Mac OS, applications would show up first in the list, but that wasn’t always the case in late version of macOS 10.x and Big Sur (11.x).

        Spotlight Settings: Uncheck to declutter search results

        In a recent fit of the machine is working against me rather than helping me, I opened the the Big Sur Settings app, clicked on the Spotlight preferences control panel and unchecked everything in the list except Applications and System Preferences. I may turn on the option to search for definitions in the Dictionary app, but for now, that option remains off.

        So roast my Spotlight usage and preference settings. But for me, this is one time where I chose to customize my Mac to work for me rather than against me.

        And I’m happier for it.

      3. mac os x,  macintosh,  security,  vintage

        Mac OS X 10.4 Tiger’s Java Updates

        Running Mac OS X Tiger? You’ll have some Java updates to apply!

        When restoring vintage Macs, I like to upgrade Mac OS / Mac OS X / OS X to the latest release to make sure that I have the very latest software on my gear. For my latest project, I am installing Mac OS X 10.4 Tiger and all of the available updates from DVD and Software Update. Looks likes Java has had quite a few updates.

      4. how-to,  ipados,  mac os x,  numbers

        Adding Videos to Apple Numbers Spreadsheets

        Numbers is the spreadsheet application in Apple’s iWork productivity suite. With the recent release of Numbers 10.1 for macOS, you are now able to embed and playback YouTube and Vimeo videos directly in Numbers spreadsheets.

        As a longtime user of Apple Keynote and Microsoft PowerPoint, I understand why presenters would want to add a video to their slide decks, but videos in a spreadsheet, that seems a little weird. So, naturally, I had to try it.

        Apple’s website shows beautifully crafted works of art cleverly disguised as spreadsheets. As and IT professional, my spreadsheets are usually uninspiring lists of things hastily thrown together so that I can quickly move on to the next thing that needs my attention.

        YouTube video embedded in a Numbers spreadsheet

        In my sample Numbers spreadsheet, I have a very simple high-level task list for deploying some computers and joining them to a domain. To provide instructions for redeeming an Apple gift card code, I embedded a YouTube video from the Apple Support channel. Using videos as a way to help illustrate how to perform a task is just one practical example of why one might want to embed a video in a spreadsheet.

        To embed a video in your Numbers document:

        1. Find the web video you want to embed and copy the videoURL
        2. Select the Numbers sheet where the video will be embedded
        3. Click/Tap the Media Add > Web Video
        4. Paste the video URL and click Insert
        5. Reposition and resize the video as needed

        There are a few problems that you will need to be aware of if you are going to use videos in your spreadsheet for professional purposes. The first is that you will have to click (macOS) or tap (iOS/iPadOS) the play button twice to get the video to play. The first click loads up the video, which is pretty quick, and the second begins playback. The second is that your video will not be playable in full screen. Depending on your use case, that could be a deal breaker. Your mileage will vary depending on your project’s needs.

        To learn more about how to add embedded videos to your Numbers spreadsheets, there are detailed directions on Apple.com.

      5. apple,  hackintosh,  mac,  mac os x,  vintage

        Apple Clones and the “Hackintosh”

        In the world of technology, there are clones and then there are hacks. Depending on who’s point of view is being used and when, clones and hacks can have both positive or negative connotations. Take for instance the well documented case of Samsung outright cloning, or copying, many aspects of early iPhone hardware and software. When talking about personal computers, Macintosh and Apple // clones are fully licensed machines while “Hackintosh” PCs are unauthorized illegal work-alike machines.

        In Apple’s long history of making computer for the rest of us, few companies have received special status from Apple to make Macintosh clones. In the mid-1990s, PowerComputing’s PowerWave 604/132 and the UMax SuperMac S900/200 are two examples of favored status Macintosh clones.

        A Hackintosh computer on the other hand, is an unlicensed personal computer built from commodity hardware and modified in such as way as to boot the macOS/MacOS/OS X operating system. To do so, one must bypass Apple’s licensing restrictions and copy protections. Hacked copies of Apple’s computers are nothing new. Dating back to the 1980s, the VTech Laser 128 and the Franklin Corporation Franklin Ace 100 were two popular, and unlicensed, Apple // clones. The name “Hackintosh” itself is an amalgamation of the words “hack” and “Macintosh”. In Apple’s view, a Hackintosh is a very bad thing. From the point of tech enthusiasts, a Hackintosh is a call back to the early days of computing when tinkering with hardware and software to make something new or work in ways that were not intended by the original thing is exciting and challenging.

        In my view, having worked with both PowerComputing PowerWave “Macs” and a “Hackintosh” or two, the experience is a little bit of both. While PowerComputing boxes were fully licensed clones of the Apple PowerMacintosh PCs of the day, and could boot and use current versions of classic MacOS, I always felt that the commodity hardware was inferior to the more expensive components in Apple’s PCs. For example, after ordering a fleet of 12 PowerWave towers, six of them were defective right out of the box.

        Tinkering with a Dell Mini 9 netbook to coax it into running Mac OS X 10.5 Leopard was both a fun science project and an oddity in the office after many of the Macs had been replaced with Windows PCs. The amount of hacking the Dell netbook to install a modified version of the computer’s BIOS and hardware driver software was not for the uninitiated.

        One the plus side, a Hackintosh offers an enthusiast a number of configuration and optimization options that are just not possible with an official Macintosh. The ability to use any case style or video card are just two examples. One big draw of a Hackintosh PC is price. Hackintoshes offer a means to get the same or better raw computing performance out of readily available hardware at a much lower price. I remember the point about price being promoted in an old computer book I purchased in the early 1990s titled “How to Build a Cat Mac”. Remember the time when we actually went to a book store to buy books? The premise of the book is that you would take the motherboard out of an old Mac and retrofit it into a PC case and use PC components with it. Unable to afford a Mac as an early teen, let alone take it part to tinker with it, building a Cat Mac was not an option back then, even if I did find the idea of building my own customized Mac fascinating.

        However, there are some significant downsides to using clones and Hackintosh PCs. For one, Hackintosh computers are not legal from a software licensing perspective. While not usually a serious issue for a home enthusiast, trying to build a business around selling Hackintosh computers to consumers is a precarious position at best. Such was the case for Psystar Corporation and OpenCore Computer currently. For me personally, inferior battery life on the Dell Mini 9 Hackintosh was a deal breaker as was having to wait for authorized clone makers to update and release their modified versions of MacOS and driver software after Apple released the software for the Macintosh. For me, not having the latest and greatest software bits to play with is a deal breaker. While I am glad that Hackintosh computers exist from a hobbyist standpoint, I much prefer to have a computer and operating system that just work. While I don’t have my Laser 128, my Dell Mini 9 netbook, or even my old Cat Mac book, I do remember all three fondly and am grateful that I was able to learn from and tinker with them.

      6. adobe,  flash,  mac,  mac os x

        Uninstalling Adobe Flash

        Adobe Flash’s days are numbered. Flash is one of those technologies that I never liked using. Using a Flash app on a small business website was never great, but Flash on commercial websites just felt gross, slow, and never felt like it belonged on my Mac. Adobe announced that they would discontinue Flash Player for interactive content at the end 2020. Unfortunately, Adobe’s announcement was in 2017. With months still left on the countdown clock, why are we talking about Flash now?

        In the intervening years, Safari, Firefox, and Chrome have been becoming more aggressive at warning and then blocking access to Flash apps. Starting with Safari Technical Preview 99, the WebKit team will be completely removing support for Adobe Flash support from the browser.

        Long time Apple fans knew that this day has been coming. From the get-go, Apple famously did not allow Flash to run on their iOS platform. It was a decision that I fully supported after seeing how terribly Flash ran on Palm webOS devices. A decade ago, the late Steve Jobs ranted about Flash in a 1,600-word argument against the technology in a blog post titled “Thoughts on Flash“. In the post, he made an impassioned plea to convince the tech industry, and Apple customers, that Flash was a terrible technology while also arguing that Flash-free Apple products would perform better. It was classic Jobs: fight for the users and Apple all at the same time.

        So, now what? If you are like me, I’m ready to ditch Flash now. I already use the Safari Technology Preview beta software. My remaining need for Flash, working with a team that still used Flash on their website, has gone away. Now, I’m ready to rip Flash out of macOS 10.15 Catalina. Here’s how we can uninstall Flash together.

        First, go get Flash uninstall tool from the Adobe website.

        Next, double-click the uninstall_flash_player_osx.dmg download file. This will create a Flash Player drive icon on your desktop (below, left and center).

        Inside the Flash Player drive, double-click the Adobe Flash Player Uninstaller.app file (above, right). When prompted, enter your macOS password to authorize the removal of Flash.

        When you are done, drag the Flash Player drive icon and the uninstall_flash_player_osx.dmg file to the trash can icon in the Dock.

        Since Flash has a System Preferences control panel and plug-ins for the web browsers that you may have installed on your Mac, I like to also add in a reboot just for good measure.

      7. apple,  mac os x,  macbook,  macbook air,  macbook pro,  macintosh

        Oh, for “F”s Sake!

        With the introduction of the 2016 MacBook Pro line, Apple introduced a number of new features, including an all USB-C port configuration, the Butterfly Keyboard, and the Touch Bar with Touch ID sensor. The Butterfly Keyboard is ok, but I preferred the Magic Keyboard from the iMac. I don’t use many USB peripherals, so USB Dongle Town to convert USB-C to the popular USB-A wasn’t too bad. The Touch ID sensor has been a great addition to the MacBook Pro. However, the Touch Bar has been seen by many Mac users as a so-so addition.

        The default Finder Touch Bar configuration on a 2016 15-inch MacBook Pro

        The Touch Bar replaced the standard Function Key (F Keys) row that sat above the number row of keys on the standard MacBook Pro keyboard. To be sure, the technology behind the Touch Bar is impressive, featuring a Retina Display with touch input. The whole thing is driven by the secure T1 chip which is running a stripped down version of watchOS.

        While I like using the Touch Bar for things like activating Siri, adjusting the brightness and volume controls, and media keys in the Music/iTunes app. In my opinion, the Touch Bar never realized the excitement that Apple had hoped. It is cool, but I can live with out it.

        The Touch Bar configuration when holding down the ‘fn’ key on the MacBook Pro keyboard

        Meghan, who has a 2019 13-inch MacBook Pro, recently complained to me that her Mac didn’t have the F Keys that her fellow engineering program classmates have on their Windows PCs. In typical Apple fashion where a “clean” design is valued over user functionality, holding down the “fn” key on the MacBook Pro’s keyboard changes the default Mac Touch Bar keys into Windows/Unix-style F Keys.

        Constantly pressing the fn key to bring up the F Keys can get old quickly if you are working on an exercise in class or a homework assignment. Fortunately, you can setup a macOS shortcut for the Touch Bar that flips the behavior around. Here’s how to set up a Touch Bar F Key shortcut by application.

        Configuring the MacBook Pro Touch Bar To Show Function Keys By Default Per app

        The Function Keys Keyboard Shortcuts allows you to toggle the F-Keys on when an app on the right is launch, in this case, Microsoft Excel
        1. Open the Settings app in macOS.
        2. Navigate to or search for the Keyboard control panel.
        3. In Keyboard control panel, click the Shortcuts tab.
        4. On the Shortcuts tab, select Function Keys from the left window pane.
        5. On the Shortcuts tab, click the plus icon to add the app(s) you want to default to the F keys configuration.
        6. Repeat this process for all of the apps you wish to add.
        7. When done, click the red close window button in the top left of the Settings window.
      8. apple,  apple tv,  homepod,  ios 12,  mac os x,  update,  watchos 5

        Apple Releases Multiple Software Updates for iPhone, iPad, Mac, HomePod

        Earlier today, Apple released a number of maintenance and security updates for all of their OS platforms. At 1:00pm Easter time today, Apple pushed out iOS 12.4, watchOS 5.3, and Mac OS Mojave 10.14.6. Also getting updates today were current editions of Apple TV and the HomePod.

        Just in time for the arrival of iOS 13 and new iPhones, Apple added a new feature that allows users to directly migrate data between old and new iPhones. That seems like a neat party trick, but not entirely unexpected give Apple’s work to refine the process of sharing information between iOS devices, iOS to Mac OS devices, and iOS to watchOS.

        On watchOS, a patch has been added that corrects an issue with the Walkie-Talkie app. Once the update has been installed, the feature will be available again.

        iOS 12.4 update details
        watchOS 5.3 update details
        Mac OS Mojave update details

      9. apple,  ios 11,  mac os x,  security,  update

        Apple Issues ‘Meltdown’ and ‘Spectre’ Patches for iOS, macOS, Safari

        apple_ios_1122_mealtdown_spectre_patch_20180108

        Today, Apple has posted a set of updates that are designed to patch recently reported vulnerabilities found in Intel and ARM CPU processors. These are very important security updates. You should install them as soon as you can.

        Apple Software Updates

        apple_macos_high_sierra_mealtdown_spectre_cpu_patch_20180108

        Ready for your downloading and installing pleasure are:
        * iOS 11.2.2 for iPhone 5s and later, iPad Air and later, and iPod touch 6th generation
        * macOS High Sierra 10.13.2 Supplemental Update
        * Safari 11.0.2 for OS X El Capitan 10.11.6 and macOS Sierra 10.12.6

        The Apple support website always links to the latest security patch updates.

        The Short Story

        The vulnerability, which impacts all modern Intel and ARM CPUs, can be found in just about every PC, smartphone, and tablet on sale. Microsoft Windows, Linux distributions, and hardware vendors all need to update patches to prevent the “Meltdown” and “Spectre” vulnerabilities from being exploited and granting cyber-attackers access to highly sensitive data that is held in a computer’s protected memory space.

        Confused about all of this processor vulnerabilities and patching? It’s totally understandable. If you really want to understand what’s going on, check out Rene Ritchie’s excellent Meltdown and Spectre FAQ at iMore.com.