For my next video, I try to remember how to setup and use a 37 year old dot matrix printer. How many mistakes can I make trying to print a short ClarisWorks 2.0 document from a Mac Classic II?! You will have to watch to find out.
-
-
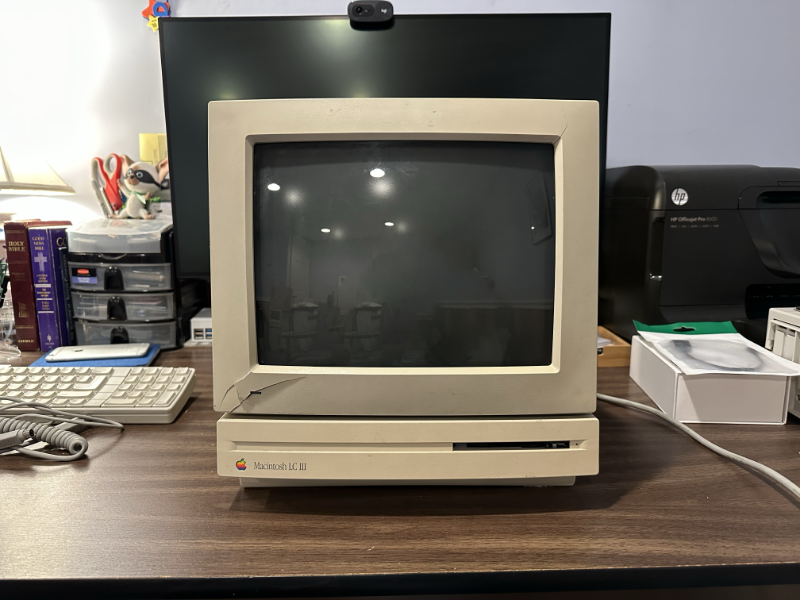
Mac LC III Restoration and Upgrade

As part of this year’s #MARCHintosh event (yes, I’m late, or am I really early for the 2024 event?), I started a project to restore and upgrade a vintage Apple Macintosh LC III. Originally released in 1993 at a starting price of $1,349 for a 4MB/80MB system, this Low Cost Color computer was intended for home users who wanted and inexpensive color Macintosh and at schools who needed a way to leverage their Apple II software library through the use of the optional Apple IIe Card, a $250 add-in expansion peripheral.
This repair was more work that I originally expected. To get this old Mac back up and running, I needed to replace the 80MB Quantum ProDrive ELS hard disk drive with a BlueSCSI v1 hard disk emulator. Then, I needed to take apart and service the 1.44MB SuperDrive floppy disk drive to remove the old grease. Thankfully, getting the Apple IIe card and Motorola 68882 FPU co-processor working was straight forward.
Overall, this was a fun project to work on, but there is still more work to do. While restoring this Mac LC III, there was plenty of evidence that I’ll need to address the issue of leaky capacitors to get the internal speaker working normally, perhaps add some more RAM, and wow! is that internal fan loud! It sure would be nice to have a quieter fan in there. However, that will be work for a future video.
-
Servicing a Macintosh 12-inch RGB Monitor
Apple Macintosh RGB Monitor, via RecycledGoods.com Apple’s Macintosh RGB monitor was intended to be the companion monitor for the company’s Macintosh LC-series of computers.
Before I could set about working on my Macintosh LC III #MARCHintosh2023 project, I needed to service the monitor that my LC (Low Cost Color Computer – I know, the acronym seems to be missing a few letters) was going to need.
Come watch the roller coaster ride of will he or won’t he repair this monitor but stay to see if I electrocute myself!
-
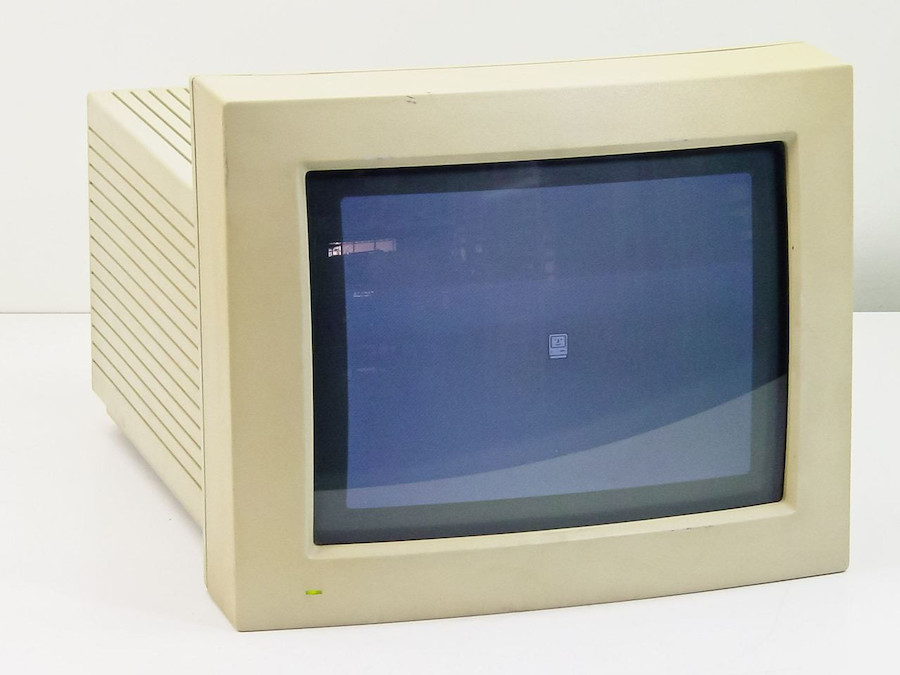
Apple Macintosh 12-Inch RGB Display
Better get a Band-Aid because I don’t think a Magic Eraser can buff that out! I purchased a Macintosh LC III (1993), the companion Macintosh 12-inch RGB Display (1990), and an ImageWriter II printer (1985). What can I say? The Mac had an Apple IIe Card (1992) installed.
One of the things that you will inevitably have to deal with when you get into retro computing is tracking down technical information about the equipment to repair and service it.
As for my monitor, well, as you can see from the picture above, old brittle plastics don’t always hold up to the stress of being shipped around the country. I’m using PAPPP’s blog post to help me take apart and get inside my monitor so I can replace the CRT housing.
I wanted to share the information that I collected and downloaded. Hopefully, if you are looking for more information about the 12-inch RGB Display that has found its way to you, this will help.
Apple Macintosh 12-inch RGB Display: Technical Specifications
Apple Monitors and Mass Storage Service Guide from October 1992
LowEndMac.com’s Macintosh 12″ RGB Display write up, including a list of compatible Mac models and product details.
PAPPP’s Rambling – Apple 12″ Macintosh RGB Monitor Recap discusses how to open and replace leaking electrolytic capacitors.
Console5 Apple 12-inch RGB Display Recap Kit contains all the replacement capacitors necessary to service the display.
Good luck with your repair! A serviced CRT display is one less CRT display headed for a landfill!
-
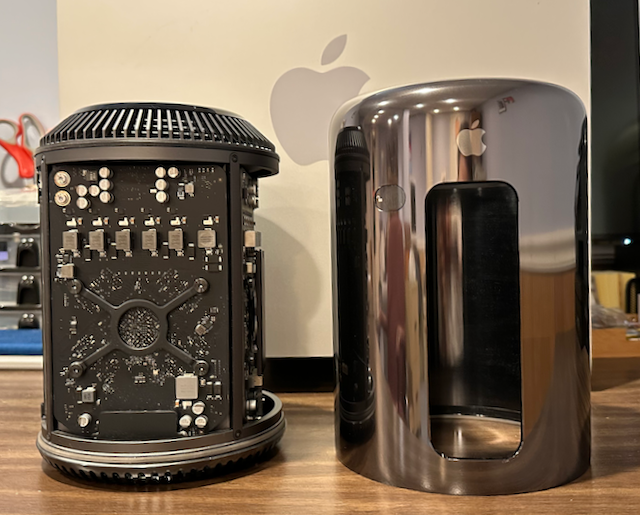
2013 Mac Pro Homecoming and Retrospective
The 2013 Mac Pro (left) joins the Museum “Pro” Family In the summer of 2013, at that year’s Worldwide Developers Conference, Apple executive, Phil Schiller, previewed the then all-new Mac Pro that would go on sale in December of that year. The boxy “Cheese Grater” design was swept away and a new sexy Space Grey polished aluminum housing for its cylindrical body was ushered in.
While looking at old computers on eBay, I came across several 9-year-old Mac Pro towers at a fraction of their retail cost. Most were B stock equipment. Banged up, scratched, and for some of the used computers, broken USB ports. I started watching several of them, getting outbid on many of them. On eBay, $200 looks like a great price, until the final few minutes where the real bidding happens. Eventually, I was able to find a Mac Pro with all of it’s ports working and in good condition. I received my new to me Mac Pro earlier this month.
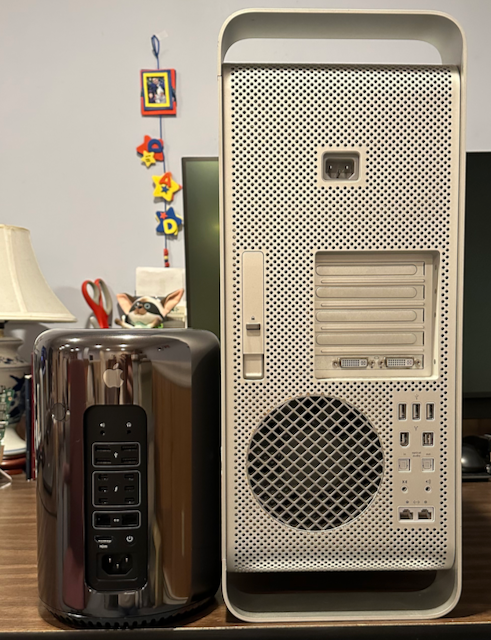
2013 Mac Pro’s ports (left) compared with 2006 Mac Pro’s ports (right) The 2013 Mac Pro was a radical departure from previous models in the Mac Pro line. Stripped of all of the internal expansion bays, the 2013 was reduced to the essence of the computer: CPU, memory, disk, video, and networking. For everything else, users would have to connect external wired peripherals. Unlike the front-to-back air flow of the physically larger Mac Pro towers, nicknamed “Cheese Graters”, the cylindrical “Trash Can” Mac Pro relied on a triangular system board arrangement that radiated heat into the core of the machine to be drawn up and out the top by a single large fan. The 2013 Mac Pro runs dead silent unless pushed very hard. The only way I know that it is turned on is because the monitor wakes up when I tap the space bar on my keyboard.
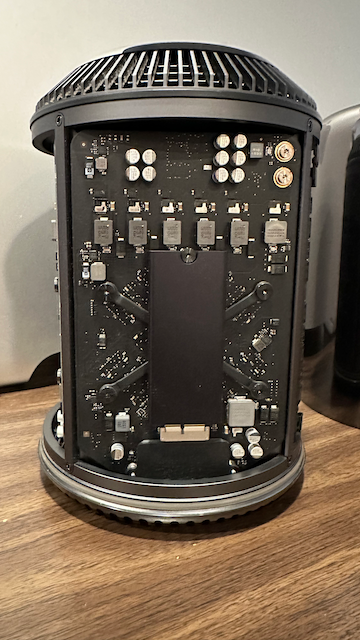
2013 Mac Pro with case removed, showing CPU board The 2013 Mac Pro went on sale for online orders starting on December 19, 2013. The base model Mac Pro shipped with a single quad-core 3.7GHz Intel Xeon E5 CPU, 12GB of ECC DDR3, dual AMD FirePro 300 GPUs, and 256GB of SSD storage. Six Thunderbolt 2 and four USB-A 3.0 ports round out peripheral connections. The external expansion ports being intended to take on the load of the internal card slots of earlier Mac Pro systems. The Mac Pro also includes dual 10Gbps Ethernet RJ-45 NIC ports for high-speed networking to things like network attacked NAS storage arrays. The base model retailed for $2,999 with a six-core configuration selling for $3,999. Unlike most other products, the 2013 Mac Pro was both designed and built in the United States. A trend, in my opinion, that I would like to see more of in the future now that the CHIPS and Science Act of 2022 has been signed into law.
The 2013 Mac Pro originally shipped with Mac OS 10.9 Mavericks. While it would have been nice for Mac Pro owners if Apple chose to release 2022’s Mac OS 13 Venture for the Mac Pro, Mac OS 12 Monterey will be the last official upgrade for the 2013 Mac Pro.
Mac Pro’s OEM 1TB M.2 nVME SSD My 2013 Mac Pro has a slightly different configuration that I cannot fully account for. It arrived with the stock quad-core E5 Xeon CPU, and it still has its OEM 1TB SSD. However, the machine only had 8GB (2 x 4GB) of non-OEM non-ECC RAM. The DIMMS in my Mac were matte black and locked like stock RAM, but they weren’t. For high-end use cases, like those the Mac Pro is intended for, Error Correcting Code (ECC) memory should be used due to its ability to detect and correct minor data errors that can lead to data integrity problems and file corruption. I decided to purchase and install an OWC 32GB (2 x 16GB) RAM upgrade kit using DDR3 ECC-R 1866GHz RAM. The OWC upgrade kit was about $60 USD. Apple has a KB article on the 2013 Mac Pro memory specifications if you want to choose a different memory vendor.
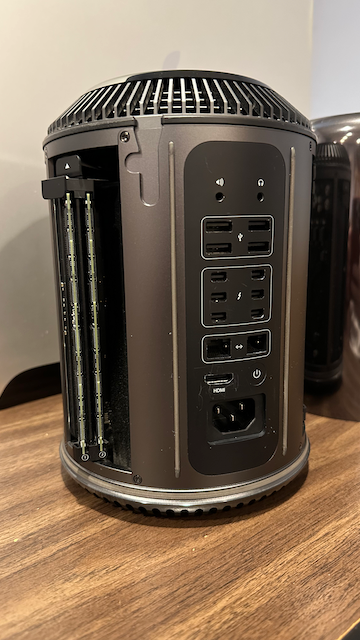
Two RAM bays, one on each side, pop open so you to install 64GB (4 x 16GB) of RAM Since I plan on using my Mac Pro, with its 3.7GHz Xeon CPU for running my Intel-based VMware Fusion (aka Workstation in PC parlance) virtual machines. 32GB of RAM should be fine for this use case. If I need more RAM, I can add another 32GB upgrade kit and install the modules into the remaining two memory slots. If you want to tinker with a 2013 Mac Pro of your own, you are in good luck. It is possible to upgrade the Intel Xeon CPU, SSD via an adapter bridge board, and the aforementioned RAM. For an extensive list of hardware and software upgrades that can be performed on the 2013 Mac Pro, also known as MacPro6,1 (Late 2013), check out Greg Gant’s excellent upgrade guide.
The Mac Pro launch was greeted with fanfare from hungry professional customers who had been worried that the Apple was about to abandon the high-end workstation market and focus solely on consumer hardware, like the iMac. However, once the new Mac Pro started shipping to customers things started to turn bad for Apple and customers alike. Apple, in a rare misstep, chose to build the 2013 Mac Pro around dual AMD FirePro video cards. While this configuration worked well for Apple software, like video editing Final Cut Pro, third-party software needed to be updated to support dual video cards. The rest of the industry, focused on single powerful GPU cards.
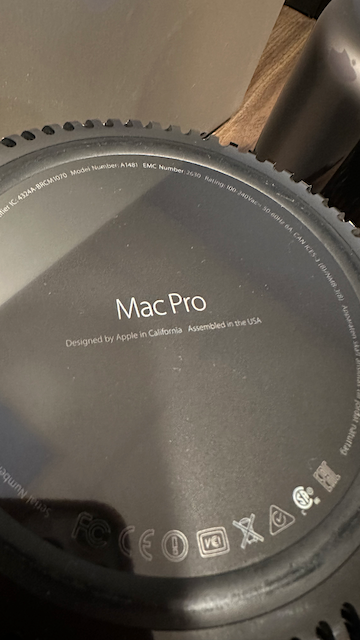
Mac Pro: designed and assembled in the USA Apple needed to face the fact that they were not going to be able to upgrade the GPU support in the 2013 case design. The dual GPU bet not paying off resulted in four years of not being able to deliver any significant system upgrades, resulting in the 2017 Mac Roundtable discussion with a small number of tech journalists. During that meeting, Apple executives talked about their plans to completely revamp the professional’s Macintosh by returning to a modular design with an Apple external monitor, reversing a decision to cancel the Cinema Display line of first-party monitors.
It would be another two years before Apple introduced the 2019 Intel-based Mac Pro desktop computer and Apple Pro Display XDR. The 2019 Mac Pro was everything that professionals wanted – a large Cheese Grater design that they could stuff full of disk drives, RAM modules, and expansion cards. Everything they wanted, except maybe, the $5,999 starting price. Anyone seriously considering the 2019 Mac Pro would almost certainly want to bump up some of the base model specs, pushing the price of the machine well beyond the starting price. And that was before considering the purchase of the $4,999 Pro Display XDR monitor with Pro Stand, a $999 option.
Today, the complicated Mac Pro story continues as the Mac Pro is one of two remaining Apple computer that have not yet made the transition to the in-house designed M-series Apple Silicon ARM-based CPU designs. In my option, 2022’s Mac Studio and Studio Display was meant as a partial stopgap release for a heavily rumored 2023 Apple Silicon rumored Mac Pro. That has left customers and fans to wonder if the next Mac Pro will be another Cheese Grater like the 2019 model, a compact Mac Studio design, or something else entirely. While I would like to see another “big iron” Cheese Grater design myself, I feel that we are going to end up with something more like the Mac Pro, with limited to no internal card slots and locked down RAM and primary storage like we have seen with M1 and M2-based Mac configurations.
For now, I am happy to have gotten a 2013 Mac Pro. It has an innovative design that will be an interesting talking point in a collection of boxy Macs from yesteryear. And, while Apple may no longer be supporting the 2013 Mac Pro hardware or releasing new versions of Mac OS for it, my new Mac Pro has a long second life ahead of it running my Windows virtual machines. Nice.
-
Restoration Projects Update
Back in December (2021) I posted a picture on Twitter of a pair of Mac SE compact Macs and a Power Macintosh 7200/120.
They were part of my Christmas break project to occupy my time while on vacation. A nerds gotta nerd.
I also picked up an Apple //e. And, a Mac mini.
So, I figured now is a good time to give an update on where these projects are.
Mac SE Rebuild (January, 1987)
My first Macintosh was the Mac Classic (1990). It was a great machine to have, and it felt like the natural, albeit without color, extension of my Apple IIgs and GS/OS. A few years later, once I got into the workforce, I was introduced to the Mac SE, the machine that the Classic was based on. I thought that it and the Mac SE/30 looked so cool with its Snow White design language. When I decided to do a rebuild of a compact Mac, the SE was the perfect choice since it represented my nostalgia for my Classic and a timeless classic of the compact Mac era from Apple’s history.
The picture shows two Mac SEs because the first one was damaged in shipping and became the donor parts machine for the second, which was in better external shape.
The case of the SE is cleaning up very well. I have used many cotton swaps, wipes, and IPA. Likewise, the motherboards cleaned up well also. I cut out the PRAM batteries before they leaked.
The biggest problem is restoring the floppy drives. The three Sony 800kb floppy drives that I have need to be stripped down, cleaned, greased, and lubricated, and work needs to be done to carefully work on and clean the eject gear mechanism. This is clearly the most difficult part of the restoration.
I believe that my Mac SE rolled off the assembly line as a dual 3.5-inch floppy drive model because it came with a third-party Microtech spacer in the top floppy drive position. On this project, I want to put the SE back into that configuration. I will be ordering the bracket that is used to secure two floppy drive cages together. With an open source BlueSCSI microSD card to SCSI interface board. When reassembled, the BlueSCSI board should sit nicely on top of just behind the stacked floppy drive cage.
Apple //e Enhanced (March, 1985)
As we saw in my welcome home video, the Apple //e is really good shape. At some point, I’ll need to remove the motherboard, clean it, and then reinstall a replacement set of plastic standoffs and screws. I’ll wait to do all of that work until I find the parts I’ll need.
The //e is working fine, and it has pasted its built-in diagnostics test (hold down both Apple keys and then power the unit on). I can keep using with a Dell LCD monitor and my Big Mess of Wires Floppy Emu. While I don’t have my first Apple //e anymore, I do have the 5.25-inch disks that came with it, and I would like to connect a pair of disk drives to it. The card that is installed in my current //e uses the newer I/O Controller Card and connects to a DB19 disk port. I will be placing an order for a refurbished Apple 5.25-inch Apple 5.25 Drive (A9M0107). It will let me use my old disks again to boot up the computer. the I/O Controller Card can also be used with a Duodisk Drive. I liked it because it seemed to be more compact and had a spring loaded eject mechanism. My original //e had a Disk II controller card and a pair of Disk II drives. If I can find a working card and drives at a reasonable price, I would buy them. I didn’t know this at the time, but the Apple //e could use the 3.5-inch floppy drive that I had with my Apple IIgs. The //e needed an Apple LIRON disk controller card. Those cards are a bit hard to find on eBay, however, Big Mess of Wires has developed Yellowstone – a universal Apple //-series drive controller card. Think of it as one modern disk controller to rule them all.
Power Macintosh 7200/120 (April, 1996)
Of the current restoration projects, the Power Mac 7200 needs the least amount of work. It is running fine as is. I did run across an eBay vendor who had two 512kb VRAM (video RAM) chips at a reasonable price. The 7200 has three VRAM slots on the motherboard. With the two new chips, I’ll have 2MB of VRAM and will have filled all three slots. Nice.
Looking ahead to other components, I may pick up a period accurate keyboard. My recollection of the Apple Design Keyboard was that it was supposed to be a less expensive all plastic replacement for the fan favorite Apple Extended Keyboard II. That wasn’t even a contest. I held on to my Extended II at work for as long as I could. I still have one, but I only use it sparingly as I am worried about RSI issues from prolonged use.
If the original Quantum Fireball SCSI hard disk fails, I will switch to either a SCSI2SD or BlueSCSI board. The only other upgrade that I might to do the 7200 is to install a PowerPC G3 accelerator card. At some point, my 7200 had one, as the third-party upgrade badge sticker was affixed to the front of mine. Since the card was removed, I removed the badge. I feel that installing Apple upgrade kits keeps the purity of the computer. I still haven’t made up my mind about third-party accelerators. In my past experience, they seemed like more trouble than they were worth requiring that you follow a maddeningly specific OS and extension software recipe to keep it running well.
Mac mini (Mid-2011)
While old, I wouldn’t call my recently acquired Mac mini “vintage”. This wasn’t a restoration either. Think of it as recycling an old PC by giving it a new purpose. In my book, saving old equipment from a landfill is a noble cause.
I wanted to build a home server to host selected videos and music that I purchased over the years from the iTunes Store. Yeah, I know I can just stream purchases from Apple’s server, but I grew up in a time when you had to pay for your bandwidth, and I remember what some of my monthly America Online and Verizon bills looked like. So, when possible, I like to stream video and music across my home network.
With that in mind, I upgraded the RAM on the Mac mini to 16GB using a Crucial memory upgrade kit. Then, I installed a fresh copy of Mac OS High Sierra 10.13.6 and the corresponding Mac OS Server 5 software that I had previously downloaded from the Mac App Store. Sure, it’s not the newest or fastest computer on the block, but it was dirt cheap. The mini and the memory upgrade, all in, was just about $200. I connected an extra USB 2TB RAID box for file serving and downloaded iTunes content. Boom! Home server on the cheap.
Future Projects
Once I get the Mac SE and the //e fully restored and running again I plan to take a break from restore projects. I have learned a lot from these projects so far and I’m sure that there is still more to (re)learn from using and enjoying these machines again.
As the weather turns cold again in the fall, the hunt will resume for more machines to restore or rebuild. My short list includes a Macintosh IIci, a Mac SE/30, and an Apple IIgs. If I happen across an Apple //+, Apple //c or //c Plus, Mac Classic, II-series, or Quadra 840av, well, I’ll probably scoop them up to be stored for refurbishment at a later time.
-
Apple /// Plus, Lisa 2, and the Macintosh XL
This weekend, I learned of a pair of Apple computer models that I didn’t know existed before.
As an Apple fan, I knew about the original Apple computer, the Apple // series, the Apple ///, the Lisa, and, obviously, the Macintosh line.
I was surprised to learn was that were two Apple computers that I didn’t realize existed before this weekend: the Apple /// Plus and the Lisa 2.
You can be excused, if like me, you have no recollection of either of these two niche machines.
Apple /// Plus
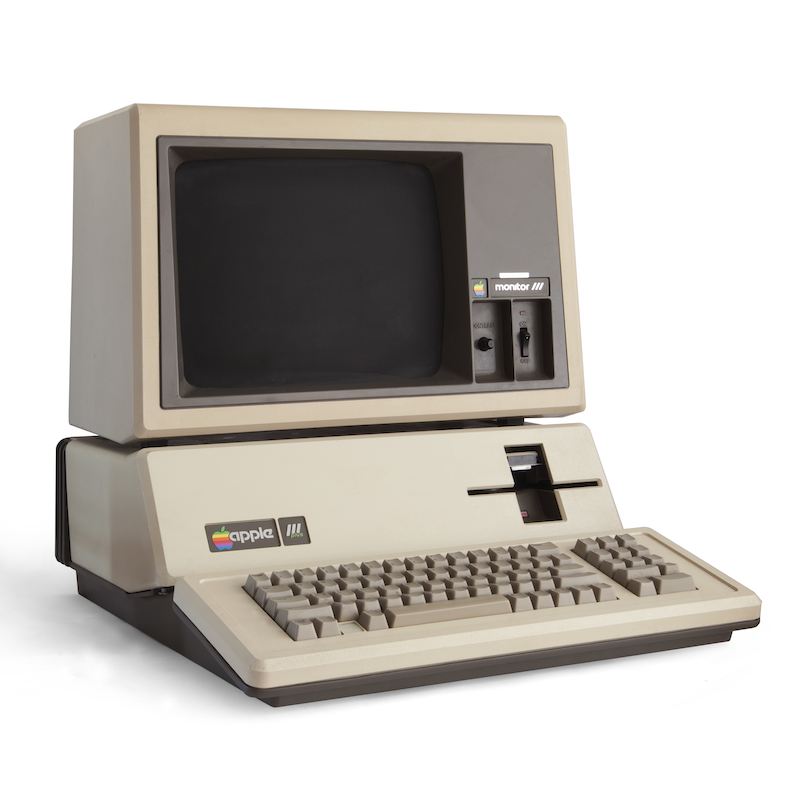
Apple /// Plus, Source: Wikipedia.org The Apple /// Plus, released in December 1993, just a month before the original Macintosh, with a base price of $2,995 according to Wikipedia. The original Apple /// suffered from overheating and ran afoul of FCC regulations relating to the about of radio-frequency interference. As a result, Apple was required to make adjustments to the Apple /// and rebranded the revision as the Apple /// Plus. Owners of an original Apple /// were able to purchase upgrade kits, including logic board upgrade kit and a keyboard upgrade kit that included a new keyboard and encoder ROM, and a new faceplate badge. These upgrades needed to be installed by an authorized repair technician.
Apple Lisa 2
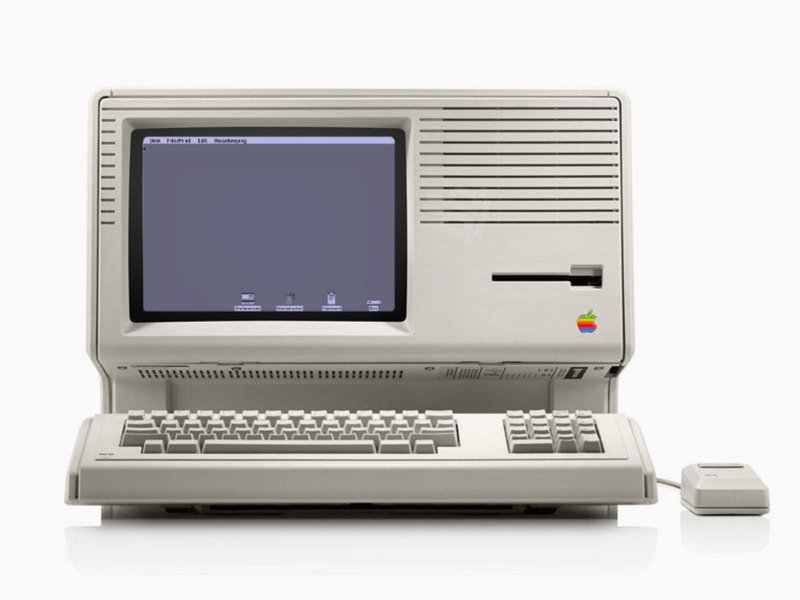
Apple Lisa 2, Source: iFixIt The Apple Lisa 2, released along side of the original Macintosh in January 1984, was a revision to the Lisa. Lisa 2 switched from the Apple II-style Twiggy 5.25-inch floppy disk drive to the same Sony 400KB 3.5-inch floppy drive used in the original Macintosh. Other upgrades included boot and I/O ROM replacement chips, and had RAM options of 512KB, 1MB, or 2MB. With the Lisa 2 having been released one year earlier, Apple offered free upgrades to the Lisa 2/5 – a Lisa 2 with a bundled 5MB hard disk. As with the Apple /// Plus, the Lisa to Lisa 2 upgrade needed to be done by an authorized technician. Lisa 2 PCs remained on sale until August 1996. The last version of the Lisa operating system was known as Lisa Office System 3.1.
Apple Macintosh XL
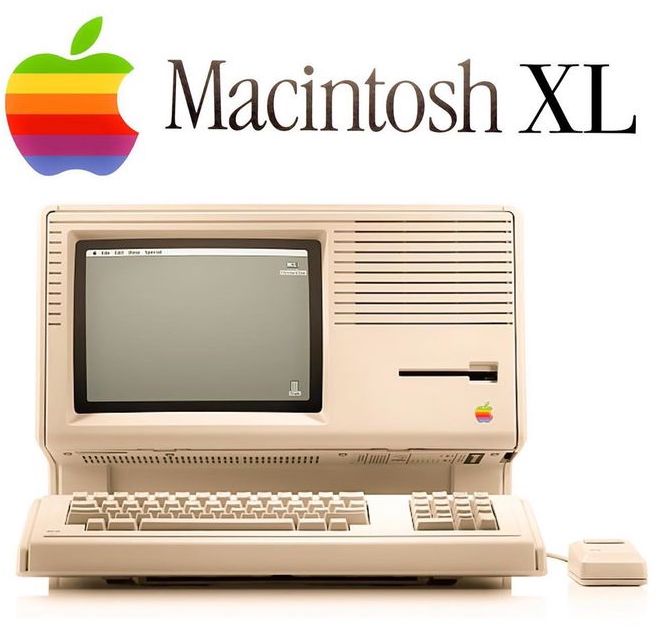
Apple Macintosh XL, Source: PinImg.com A year later, in 1985, the Lisa 2/10 configuration was rebranded as the Macintosh XL. As with the original Lisa, the Lisa 2 was given an upgrade kit that changed some of the internal hardware and software. Upgraded Lisa 2s were then able to boot into Macintosh mode, running a version of the system software known as MacWorks XL (with Macintosh System Software 1.1 support). The Macintosh XL’s final system software version was MacWorks Plus II (with support for Macintosh System Software 7.5.5 support).
Unlike it’s siblings, the Lisa and the Lisa 2, the Macintosh XL was on sale for just four months, launching in January 1995 and then being officially discontinued in April 1985. It would be eight months before Apple released it’s next all-in-one compact computer; the Macintosh Plus.
-
Mac OS X 10.4 Tiger’s Java Updates
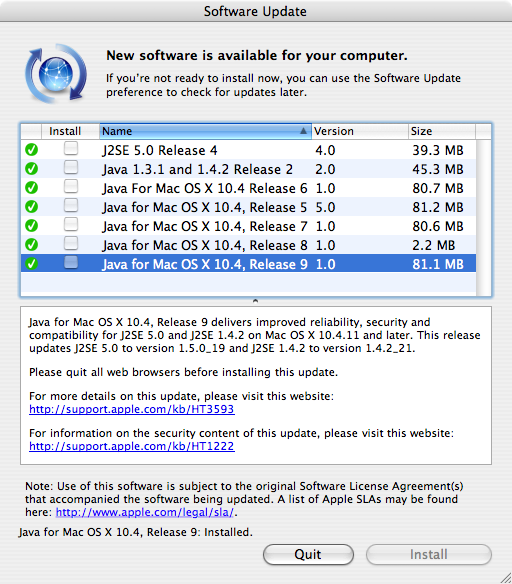
Running Mac OS X Tiger? You’ll have some Java updates to apply! When restoring vintage Macs, I like to upgrade Mac OS / Mac OS X / OS X to the latest release to make sure that I have the very latest software on my gear. For my latest project, I am installing Mac OS X 10.4 Tiger and all of the available updates from DVD and Software Update. Looks likes Java has had quite a few updates.
-
These Old Macs
One of the things that I have been doing to keep myself busy during the craziness that is the COVID-19 pandemic (please keep wearing your face coverings in public) is to refurbish some of the old Macintosh computers in my collection.
In particular, I am working on a PowerMac G4 Quicksilver (2001) restoration and a PowerBook G3 (1998) repair. Neither machine is working right now, which is understandable since they are 19 and 22 years old, respectively. Rather than talk about each repair project, I figure it would be more helpful to share some of the resources that I have found online to help others repair and overhaul their vintage and obsolete status Macs.
Repair Information and Manuals
When many Mac enthusiasts think of repair guides and tear down instructions, we think of iFixit.com. They offer a great service for sure and I have ordered my share of repair kits from them. But they are not the only game in town.
If you are looking to repair or restore an old PowerBook, you will want to take a look at PowerbookMedic.com. They have repair guides and reasonably priced spare parts to get your old MacBook back in top condition. They also offer some parts and repair services for the iMac and Mac mini.
Another great site is AppleRepairManuals.com [http://www.applerepairmanuals.com/index.php#tools]. They have a wealth of information in the form of Apple service guides as well as other helpful tips that you will need while servicing your new and old Mac, iPod, Newton, or Lisa.
Finding Spare Parts for Your TLC Project
Once you have found the part number for the component that needs replacing, sure, you can use eBay. Many of my component searches start there. But there are other online retail options that specialize in vintage hardware. Depending on the Mac, Other World Computing (OWC) might have the part. I recently purchased an inexpensive PRAM battery from them for the G4. OWC also has a neat IDE/ATA to SATA adapter and SSD conversion kits. Once I have the G4 booting again, I plan to replace an old spinning hard disk with a 120GB SATA SSD. That should give that old boy a nice little speed bump.
One of my new favorite sites for spare parts is UsedMac.com. Need a replacement IDE drive for your Mac, a floppy drive for your PowerBook, or an external Jaz drive? No problem. I just recently ordered a 6GB 2.5″ IDE notebook drive from them. It was super cheap.
The Newton
I came to the Newton late in its life. Like weeks before Steve Jobs came back to Apple and killed it late. I am still intrigued by the Newton and how cool it looks. Old Newtons and eMate portables can still be found on eBay. But sometimes you need that special part. For all things Newton, you will want to check out these great resources.
Newton Research offers a modern version of the Newton Connection Utilities that will run on modern versions of Mac OS. I was able to connect my Newton MessagePad 2100 to my Macbook Pro 2016 with Mojave.
Chuma.org has a good write up for how to get Ethernet working on your MessagePad.
Don’t forget UGreen’s USB 2.0 Type A to RS232 DB9 serial cable. This UGreen cable has a built-in FTDI serial converter so you won’t need a driver on the Mac / Windows PC side to get your Newton to connect and sync.
Software
Restoring hardware is only half of the equation. Once you have restored your computer, you may need to download and OS for it. Let’s face it, 1.4MB floppies, in my collection at least, aren’t holding up well. CDs are holding up much better. Regardless if you are the victim of bit rot, scratched discs, or may not be the most organized person in the world, the Internet has you covered.
MacintoshRepository.org has a wide selection of Apple system software for the Mac, Apple //, and the Lisa. WinWorld’s library of Apple-related software is rather extensive with disk images for System Software 0-6, Mac OS and Mac OS X. You can also download A/UX and NeXTStep.
-
Oh, for “F”s Sake!
With the introduction of the 2016 MacBook Pro line, Apple introduced a number of new features, including an all USB-C port configuration, the Butterfly Keyboard, and the Touch Bar with Touch ID sensor. The Butterfly Keyboard is ok, but I preferred the Magic Keyboard from the iMac. I don’t use many USB peripherals, so USB Dongle Town to convert USB-C to the popular USB-A wasn’t too bad. The Touch ID sensor has been a great addition to the MacBook Pro. However, the Touch Bar has been seen by many Mac users as a so-so addition.

The default Finder Touch Bar configuration on a 2016 15-inch MacBook Pro The Touch Bar replaced the standard Function Key (F Keys) row that sat above the number row of keys on the standard MacBook Pro keyboard. To be sure, the technology behind the Touch Bar is impressive, featuring a Retina Display with touch input. The whole thing is driven by the secure T1 chip which is running a stripped down version of watchOS.
While I like using the Touch Bar for things like activating Siri, adjusting the brightness and volume controls, and media keys in the Music/iTunes app. In my opinion, the Touch Bar never realized the excitement that Apple had hoped. It is cool, but I can live with out it.

The Touch Bar configuration when holding down the ‘fn’ key on the MacBook Pro keyboard Meghan, who has a 2019 13-inch MacBook Pro, recently complained to me that her Mac didn’t have the F Keys that her fellow engineering program classmates have on their Windows PCs. In typical Apple fashion where a “clean” design is valued over user functionality, holding down the “fn” key on the MacBook Pro’s keyboard changes the default Mac Touch Bar keys into Windows/Unix-style F Keys.
Constantly pressing the fn key to bring up the F Keys can get old quickly if you are working on an exercise in class or a homework assignment. Fortunately, you can setup a macOS shortcut for the Touch Bar that flips the behavior around. Here’s how to set up a Touch Bar F Key shortcut by application.
Configuring the MacBook Pro Touch Bar To Show Function Keys By Default Per app
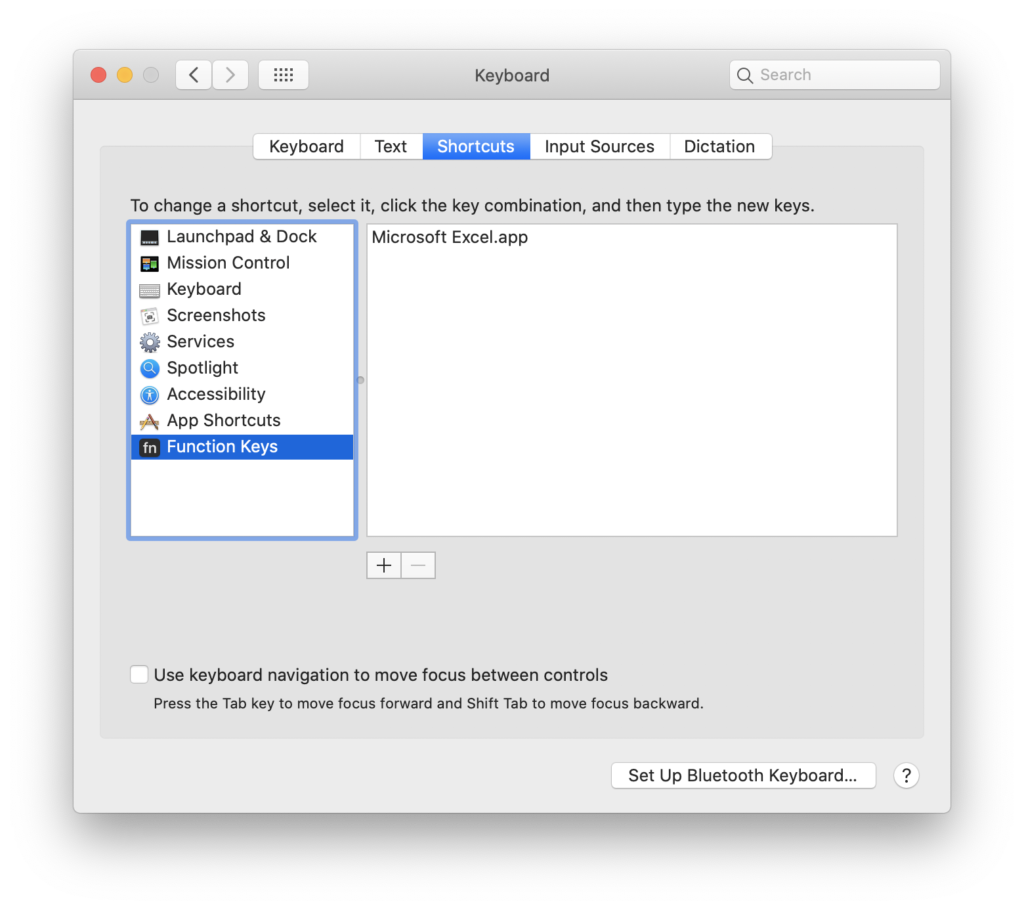
The Function Keys Keyboard Shortcuts allows you to toggle the F-Keys on when an app on the right is launch, in this case, Microsoft Excel - Open the Settings app in macOS.
- Navigate to or search for the Keyboard control panel.
- In Keyboard control panel, click the Shortcuts tab.
- On the Shortcuts tab, select Function Keys from the left window pane.
- On the Shortcuts tab, click the plus icon to add the app(s) you want to default to the F keys configuration.
- Repeat this process for all of the apps you wish to add.
- When done, click the red close window button in the top left of the Settings window.