In this second installment of my Apple IIGS Welcome-Home-athon series, I work on testing out video output, booting up GS/OS 6.0.1, verify the RAM configuration, and check which ROM my little guy has. The RetroComputing Shenanigans Bus also takes us on a short trip to Dongle Town!
-
-
Happy New Year

May the New Year be filled with all the best for you and your family.
-
The Laser 3000, My First Computer [Updated]
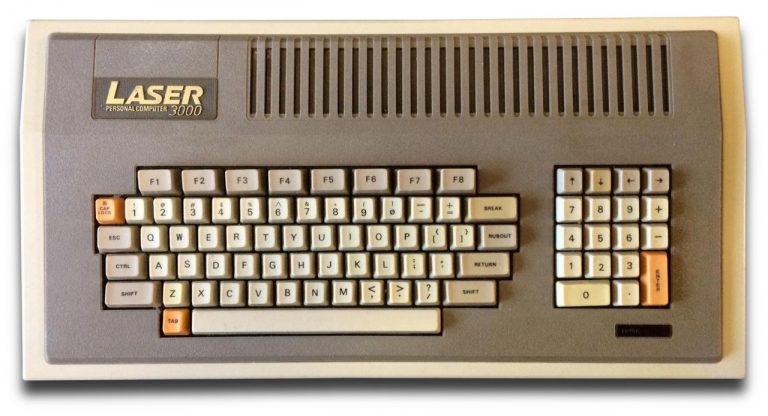
VTech Laser 3000 via Bytecellar.com Thomas Fuchs, @thomasfuchs on Mastodon, posed the question, “What was your first #computer?“
Seems like a good time as any to post my reply, both on my blog and to my Mastodon account.
My first computer was the VTech Laser 3000. It was an Apple II “compatible”. I learned, by playing games, “Apple II compatible”, felt more like an Apple II or Apple II+ compatible rather than being an Apple //e compatible. This was likely due to the software that had to be reversed engineered to make the computer work. Interesting, the Laser 3000 manual has been scanned an uploaded to the Internet Archive if you are interested in that sort of thing. The Laser 3000 was followed up by the Apple IIc clone, the Laser 128.
I remember getting the Laser 3000 for Christmas 1985. Or was it 1986? In any case, it was the “family” computer. Any preconceived notion about who’s computer it was were dispelled by the reality of who’s bedroom the computer ended up in. In addition to the computer itself, we also had an amber screen CRT monitor, the external floppy drive, and an Epson LX-86 dot matrix printer. I loved it. The Laser was a good machine to get started on. Cracks in compatibility started showing up as stores in the local mall started selling software. New software was being written and released for the Apple //e and I started noticing that the software that was being used at school wasn’t working. So before long, I started begging for an Apple //e. Which I eventually got. Second hand, but I took it.
The Apple //e gave way to the Apple IIGS. And then, in 1990, the Macintosh Classic. The reset, as “they” say is history.
Thanks, Mom and Dad. Your investment in the Laser 3000 has paid off well.
Update
A fine fellow on the Internet, replied to the Mastodon discussion, mentioned above, that the VTech Laser 3000 was also sold as “The Cat” from Australian reseller Dick Smith – similar to the now defunct Radio Shack chain here in the US. Below is a picture of the complete color system. In the picture, the Laser 3000 badge is replaced with a Dick Smith The Cat badge.
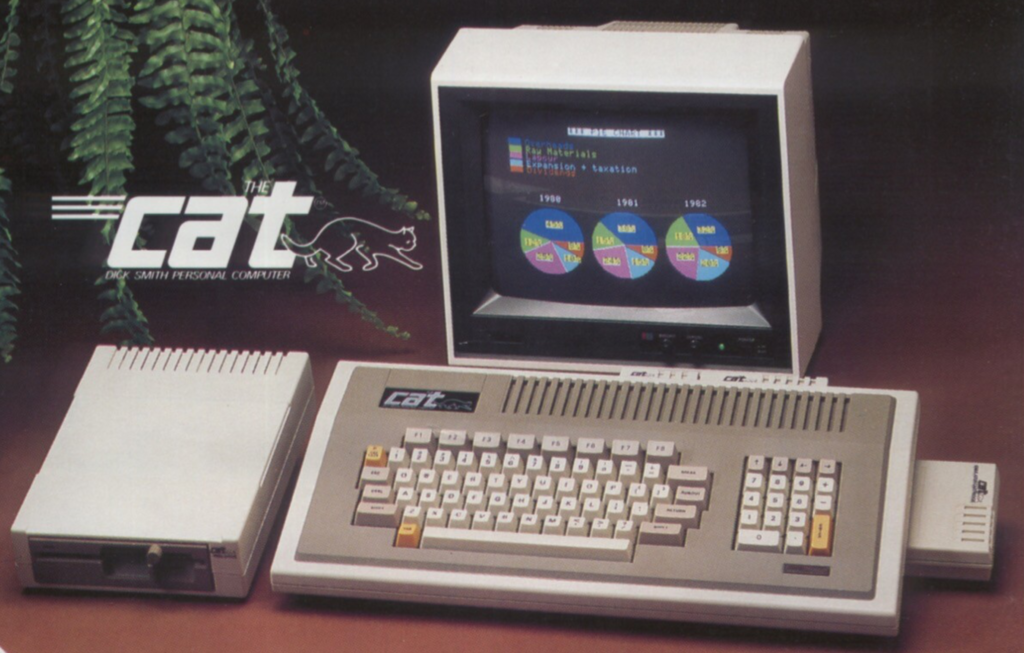
The Cat image provided by Craig Bradley -
Merry Christmas!

May the new born Christ Child bring peace, love, mercy, and tolerance toward others to our world. Amen.
Merry Christmas and Happy Holidays from your friends at Smartphone Fanatics!
-
Welcoming Home an Apple IIGS from 1986
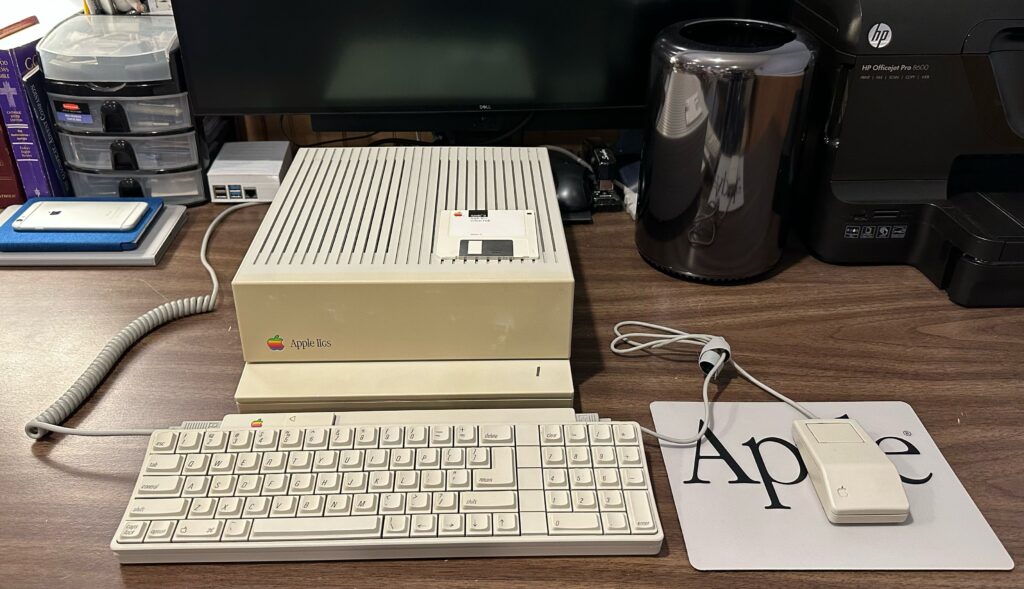
Mac Pro (2013) helps welcome home my Apple IIGS (1986) I’m an Apple //e fan, but in the mid-1980s, with the introduction of the Lisa in 1983 and the Macintosh in 1984, it was becoming clear that the largely text input-based Apple II line of computers needed an innovative refresh.
In 1986, Apple II fans got their new graphical interface upgrade in the form of the Apple IIGS.
Developed under codenames such as “Phoenix”, “Columbia”, and “Cortland” the Apple IIGS was an attempt to modernize the Apple //e and the non-expandable Apple IIc into a modern computer. At the time, attempts to replace the venerable Apple //e with the Apple III and the Apple IIc did not go according to plan. The Apple III ended up being a commercial failure and customers favored the Apple //e over the IIc largely in part due to the //e’s expansion card bays.
The Apple IIGS is a curios machie because it encapsulates both what has come before, the Apple II platform, while embracing a future with a graphical interface, a mouse, improved sound capabilities, and a 3.5-inch floppy drive – just like the Macintosh. Powering the Apple IIGS is the new 16-bit 65C816 chip running at 2.8MHz. The 65C816 is a 65C02 compatible processor, meaning that it can emulate the CPU used in prior Apple IIs. The 65C816 also has two run modes: the native 2.8MHz mode for running software written specifically for the graphical GS/OS operating sytem, and a 1MHz mode for running a customer’s older Apple II series software.
In addition to the new CPU, the Apple IIGS also includes 256kb of system RAM, expandable out to a total of 8MB. The “GS” in the IIGS name stands for Graphics and Sound, and this Apple II is able to deliver. The new GUI interface was made possible due to a new super Hi-Res video mode capable of putting a 16-color palette up on a 200×320 screen. The included Ensoniq Mirage sound chip improved the audio features of the machine.
There is a lot going on under the hood of this Apple II and that’s because the designers needed to address two project goals. First, make it compatible with the older generation of Apple II hardware and software. Second, bring the technology advancements from the Apple III, the Lisa, and the Macintosh to the Apple II line. In short, the IIGS ended up becoming a bridge from the Apple II line to the Macintosh line.1 This feat was made possible by Apple’s new custom integrated circuit (IC) the Mega II. The Mega II included the functionality of several of the ICs from the Apple //e and the IIc into the IIGS motherboard. In the end, the IIGS was able to run at least 90% of the titles in the Apple II software library. With the use of an optional disk controller card and floppy disk drive, the Apple IIGS could also read and write 5.25-inch disks created for earlier Apple IIs.
The Apple IIGS was forward looking too. For example, the graphical GS/OS environment used 114 of the same QuickDraw calls as was found on the Macintosh. The graphical interface program used to access disks, draw windows, and work with menus and files is called the Finder and is modeled after the Macintosh desktop program of the same name. The Apple IIGS also has an Apple Desktop Bus (ADB) port for connecting up to 16 daisy-chained devices. The same ADB technology that is used on the Macintosh, allowing keyboards and mice to be interchangeable. And, finally, the IIGS is the first Apple II computer to include built in support for AppleTalk networking. Yes, the Apple IIGS and the Macintosh could talk to each other and share files over an AppleTalk network.
The Apple IIGS was released in September 1986 with a base price of $999. Customers would then need to add one or more disk drives, a color monitor, and possibly a printer, easily raising the price of the machine to the $2,499 – $3,199 range.
The Apple IIGS did succeed in delivering on it’s promise to be true (and compatible) to it’s Apple II roots and simultaneously embrace a graphical interface future. And for Apple II fans, that was a positive point. However, in terms of the state of technology in 1986, many journalists coving technology at the time considered the Apple IIGS to be too slow and too expensive when compared with contemporary machines of the day, including the Macintosh, the Amiga 500, and the Atari ST.
In 1988, waiting for my back ordered Apple IIGS to be delivered by ComputerLand, I was excited to this new computer. For me, I could leverage everything that I had learned about my Apple //e with the IIGS and share hardware and software between the two machines. I will admit that my cousin’s Amiga 500 had way better looking games, but I loved my Apple IIGS. Unlike the closed case Amiga 500, the Apple IIGS could be easily opened allowing me to tinker around inside and add new expansion cards, foreshadowing my career in Information Technology. Today, I still tinker around inside PCs and servers thanks, in no small part, to the openness of the Apple II platform.
Apple II Forever!
-
Byte Magazine Archive Available
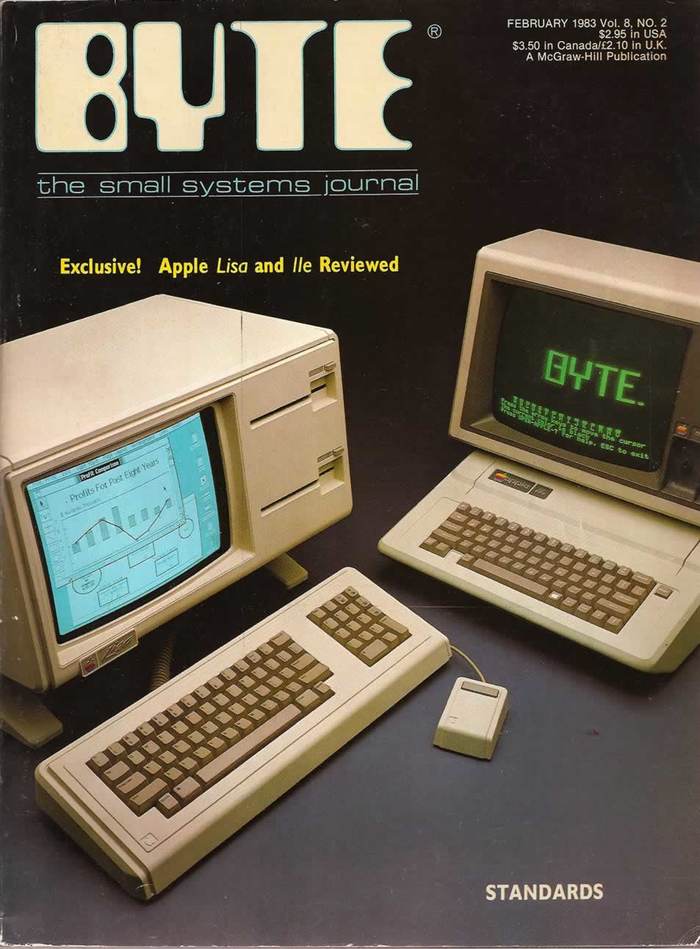
Byte magazine Feb. 1983 Cover While doing some research into the Apple IIe (1983) and the Apple IIGS (1986), I came across a large Byte magazine archive that is available on the Internet Archive.
The magazine archive is labeled as “complete” and has issues from Sept. 1975 through Apr. 1989. And while I can’t vouch for the entire archive, the three issues that I looked at had clean and easy to read articles from the issues that I wanted to read. Here are the links to the articles I was reading earlier this week.
Feb. 1983 – Apple IIe Review by Robin Moore pg 68
Oct. 1986 – Apple IIGS Preview by Gregg Williams and Richard Greham pg 84
Apr. 1987 – Apple IIGS Review by Philip Chien pg 223
I really appreciate that these archives exist. Reading computer magazines before I started my professional IT career was a fun way that I learned about computers. A+ and inCider were two of my favorites. Once I started working in IT, I loved to read Windows NT Magazine, PCWeek/eWeek, MacWeek, and Information Week.
-
Archive Your Twitter Account in Case You Get Hit with a Ban
If you are like me and have no patients for Elon Musk’s jackassery, you might be looking to move to another smaller social media community. I have opened a Mastodon account and am reconnecting with other retro computing fans.

Under Musk’s “leadership”, Twitter has gone from a stable mismanaged platform to a mismanaged platform under constant churn. Take last night’s unforced error. In a now deleted tweet, Twitter Support posted a notice that the company would begin removing accounts promoting or linking to other social networks. You can read The New York Times and CNN coverage of the latest dust up if you can stomach it.
Since I have a pinned tweet redirecting folks to my Mastodon account, I was expecting that either the tweet would be deleted, or that I would end up being banned from Twitter. So, I decided to request an archive of my account.
Here’s how to request your own archive.
Step 1: Login to your account.
Step 2: Click or tap on More > Settings and Support > Settings and Privacy
Step 3: Then, click or tap on Your Account > Download an Archive of Your Data
Step 4: Click or tap the Request Archive button.
Assuming that Twitter.com is still functioning at a basic level, within 24 hours you will receive an email with a download link to your archive download.
I’m not a prolific social media user and do not have any regrets about deleting my Facebook account years ago. As it stands now, I am fine if I get banned or suspended because I am reconnecting to other retro computing enthusiasts, as I said, on Mastodon. I am also supporting my favorite creators on Patreon. When a paid subscription also includes a Discord server, I also occasionally stop in there to hang out with other like-minded nerds. It’s nice to not be bombarded by ads and accounts that just want to cause chaos.
So, will I delete my Twitter account? I honestly don’t know. As it stands now, I probably won’t delete it yet. I am spending less time on Twitter these days. Just like discussion boards gave way to blogs which stepped aside for Twitter, I’m ready for the next thing. If Musk speeds up that transition to the next thing, so be it. Buckle up!
-
iPhone 3G Motherboard
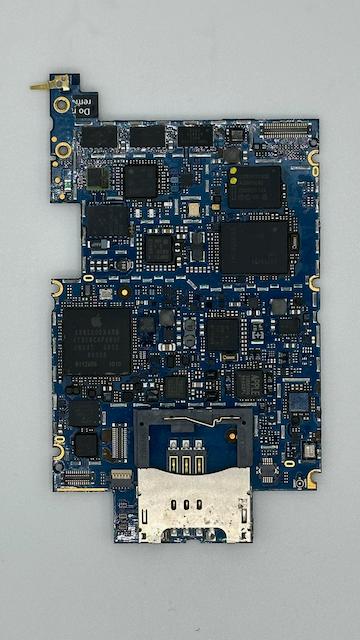
2008 iPhone 3G Motherboard What better way to spend a cold and grey Sunday afternoon in December than sorting through your spare parts bin and deciding to teardown an iPhone 3G. Don’t worry, this iPhone 3G was broken long before it came my way.
iPhone 3G (A1241) is the second iPhone to have been released. It started shipping to customers on July 11, 2008. The US model was only available on the AT&T Wireless network. 2008’s color options where Black and White. The Black model was available in 8GB or 16GB configurations, while the White iPhone 3G was only available in the 16GB configuration.
Powering the iPhone 3G is the Samsung ARM-based System on a Chip (SoC) that contains the 412MHz CPU and 128MB LPDDR memory. In the photo, above, the SoC is the large chip on the left with the Apple logo printed on it.
If you want to see a graphic with each chip labeled, visit the iFixit.com iPhone 3G Teardown page.
-
Welcoming Home a Rescued (PRODUCT)Red iPhone 7
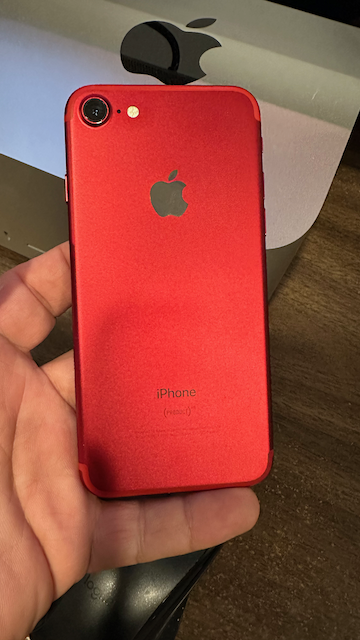
(PRODUCT)Red iPhone 7…wow, that’s red! I have been looking for a reasonably priced used (PRODUCT)Red iPhone for a while now. First introduced as part of 2016 iPhone product line, the (PRODUCT)Red iPhones, in my opinion, have a strikingly bold color that makes them standout against the other colors in the line up.
Being a nerd who has to have all of the latest iPhone features, I gravitate toward the Pro model iPhones. Apparently, Pro iPhones are not allowed to have cool color choices, so I had never purchased a (PRODUCT)Red iPhone as my daily device.
About three weeks ago, I purchased a batch of broken iPhones from seller from eBay. All the iPhones were listed “as-is” and not tested. This is eBay code for broken and/or iCloud Locked. One device, for example, a GSM iPhone 6, was in great condition, but was iCloud Locked.
One device in the listing caught my eye: a (PRODUCT)Red iPhone. No mention was made of which model it was. All I could tell from the photos was that it had a shattered display.
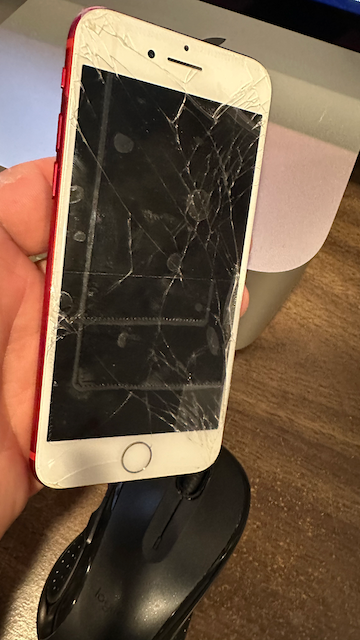
Broken iPhone 7 screen with packing tape Once the shipment arrived, I zeroed in on the (PRODUCT)Red iPhone. It had a 4-digit PIN code. I tried entering my picks from a list of commonly used PIN codes. Eventually, I reached the limit for failed PIN code attempts, and the iPhone disabled itself.
An Apple Store won’t service an iCloud Locked iPhone, so I put the iPhone into DFU (Device Firmware Update) mode, erased the device, loaded a fresh copy of iOS 15.7.1, and rebooted the iPhone.
To my surprise, the previous owner had not enabled the Find My iPhone feature. Without the Find My iPhone security feature enabled, the DFU mode iOS 15 install had the effect of erasing the previous owner’s data and reset the iPhone so I could make it my own. To test this out, I logged into iCloud with a test Apple ID and sure enough, I was able to login and assert ownership of the iPhone.
The final step, now that I was certain that the iPhone 7 wasn’t iCloud locked, was to setup a Genius Bar appointment at my local Apple Store and have the screen repaired. Thankfully, the iPhone 7 and iPhone 7 Plus models still have a “Supported” status, meaning that Apple will still service them.
I explained to the Genius who was helping me that I was the second-hand owner of the iPhone and wanted to have the screen repaired. I mentioned that I hadn’t opened the iPhone but couldn’t definitively state that someone else may have gone inside. The Genius ran the iPhone through a suite of diagnostic tests to confirm that there was nothing else wrong with the iPhone.
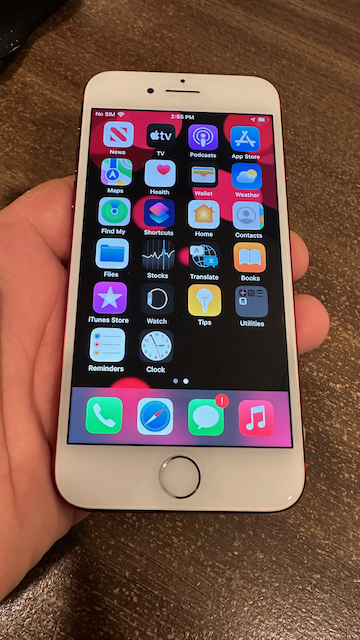
iPhone 7 with a new screen After confirming that no other defects were present, I handed the iPhone over to be serviced. It would be ready later that day. A few hours later, I picked up the repaired (PRODUCT)Red iPhone and brought it home.
Thankfully, even when you consider the repair cost of the new screen, I was able to find a relatively inexpensive (PRODUCT)Red iPhone 7. This was not the way I was expecting this story to turn out. I was expecting the iPhone to be iCloud locked, indicating that the iPhone was possibly stolen. If you plan on buying a used iPhone from eBay, be sure that the seller shows pictures of the unlocked home screen and the Settings app showing that the iCloud account is logged out. Logging out of iCloud on an iPhone will disable the Find My iPhone security feature.
In this particular case, this repair story has a positive ending, allowing me to welcome home a (PRODUCT)Red iPhone 7!
-
Happy Thanksgiving

This year, I am thankful for everyone who reads my blog. I do appreciate it.
I am also thankful for the many things that I have, including my family and our healthy, and my job.
I am also thankful that, finally, COVID-19 is starting to shift into the background of everyday life. Don’t get me wrong, COVID-19 is still a global pandemic and we should still continue to get vaccinated and wear high quality masks where appropriate.
Have a Happy Thanksgiving!
-Alan