
May the new born Christ Child bring peace, love, and mercy to you and your family. Amen.
Merry Christmas and Happy Holidays from your friends at Smartphone Fanatics!
The written musings of a long-time Apple //e and Macintosh tech nerd. Opinions are my own.
May the new born Christ Child bring peace, love, and mercy to you and your family. Amen.
Merry Christmas and Happy Holidays from your friends at Smartphone Fanatics!

This year, I am thankful for my family and friends who are helping me through a difficult time.
I am also thankful for the many things that I have, including my healthy, and my job, and you, the reader of this blog.
Have a Happy Thanksgiving!
-Alan
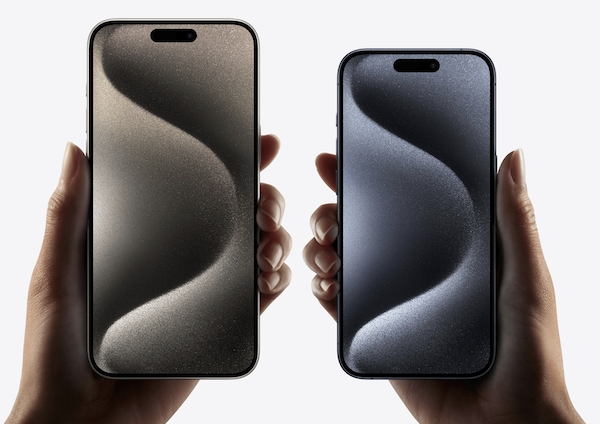
Today is the day that Apple fans have been waiting for all year long: iPhone 15 Launch Day!
You can follow our pick up adventure with the iPhone 15 playlist on my YouTube channel.
My Dad and I will be picking up our new iPhones at our local Apple Store this morning. For folks who pro-ordered like we did, I hope your pickup experience goes well.
For folks who are hoping to score a new iPhone 15 today, I hope that you are able to find the iPhone in the color and size that you are looking for.
Have a great day everyone, and congratulations on your new iPhone purchase!
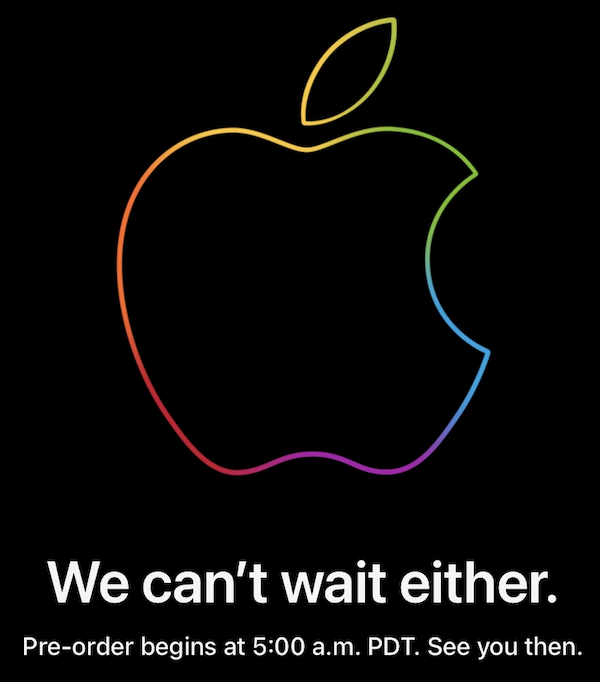
Today, Sept. 15, at 8:00am Eastern, the one true time zone in my opinion, Apple will begin taking pre-orders for iPhone 15 and iPhone 15 Pro. You will be able to pre-order your iPhone using the Apple.com website, or via the Apple Store app on your current iPhone.
This year’s iPhone 15 line up has a similar pricing ladder as last year.
iPhone 15 $799
iPhone 15 Plus $899
iPhone 15 Pro $999
iPhone 15 Pro Max $1,199
Last year’s iPhone Pro Max 128GB storage tier has been dropped and the 256GB storage tier has remained at the same price. So, in effect, the iPhone 15 Pro Max has gone up $100 in price if you wanted then 128GB version or has stayed the same year-over-year if you go for the 256GB tier like I do.
People who get their pre-orders in this morning will likely be able to reserve their new iPhone 15 for in-store pick up or delivery next Friday, 9/22.
Good luck to everyone who will be pre-ordering today! I hope you get your pick for launch day.
I have been working on restoring an Apple Power Macintosh 7100/80, first released in 1994. While tearing it down to remove the original PRAM battery from 1994, I decided to also pull out the 3.5-inch floppy drive to service it before attempting to power on the Mac.
What I discovered was that I couldn’t find any documentation (service manual, blog post, YouTube video) about how to open the drive without breaking the plastic faceplate. So, I made a video of me fumbling around trying to open the drive so you don’t have to wonder how to open it or break any plastic clips.
While flipping through Mastodon on Sunday morning, I saw a toot linking to an article on Mashable.com written by Cecily Mauran covering a new European Union legislation that all batteries sold in devices must be end-user replaceable by 2027 and contain 80% recycled materials by 2031.
There are two benefits to this new regulation as I see it.
Directive 2008/98/EC and Regulation (EU) 2019/1020
The new law is part of Directive 2008/98/EC and Regulation (EU) 2019/1020. In the updating of the Directive and Regulation, Directive 2006/66/EC is now considered repealed.
The legislation rightly identifies the growing global demand for batteries as a long-term trend.
“In view of the strategic importance of batteries, to provide legal certainty to all operators involved and to avoid discrimination, barriers to trade and distortions on the market for batteries, it is necessary to set out rules on the sustainability, performance, safety, collection, recycling and second life of batteries as well as on information about batteries for end-users and economic operators. It is necessary to create a harmonised regulatory framework for dealing with the entire life cycle of batteries that are placed on the market in the Union.”
The legislation also states that laws governing the management of waste batteries must also be updated “to protect the environment and human health by preventing or reducing the adverse impacts” of batteries.
As someone who support climate science and initiatives to reduce carbon emissions that are warming the earth, I applaud the EU’s effort to build a sustainable circular battery supply chain.
EU Regulatory Impacts to iPhone
But what about us here in the United States? In my opinion, the absolute breakdown of the Congress to actually negotiate on bills and pass legislation means that there will be no unified federal regulations about battery reuse on par with the EU’s efforts. Rather, we here in the US will be left with a patchwork effort by states and corporations to advance greenhouse gas emission reduction and meaningful recycling programs.
To understand the impact to us here in the United States, I looked to another EU regulation, making USB-C the common device charging standard.
While this regulation does not directly apply to the US, it is an open secret at this point that Apple will finally switch the iPhone to USB-C, replacing the Lightning port after an 11-year run. It is cheaper for Apple to switch the iPhone to USB-C than to try and maintain a USB-C iPhone to be sold in the EU and a Lightning iPhone to be sold everywhere else. In other words, there is a financial incentive for Apple to get on board with USB-C for charging and sync’ing data. I applaud this decision as the iPhone is effectively the only electronic device that I use daily that does not already use USB-C for charging. In my opinion, the move to USB-C from Lightning on the iPhone was long overdue.
It’s easy to get behind an EU ruling when you agree with the position they are taking. But what about rulings that you don’t agree with? Am I as willing to accept that EU rules can change the iPhone I use every day in a detrimental way? Let’s take a more reasoned approach to my initial thinking.
User Replaceable Batteries Alone Won’t Make iPhone Thicker
My first reaction to this new EU regulation was, “I don’t want a thicker, heavier iPhone”. My mind instantly went to the Palm Treo 700p, the Blackberry Curve 8330, and Android devices. They were all like carrying around bricks when set down on a table next to the original 2007 iPhone.
Consider the thickness (depth) of these mobile devices:
| Smartphone | Depth | Weight |
| Palm Treo 700p (2006) | 0.89″ | 181g |
| Apple iPhone (2007) | 0.46″ | 136g |
| BlackBerry Curve 8330 (2007) | 0.59″ | 113g |
| Apple iPhone 6 (2014) | 0.27″ | 129g |
| Apple iPhone 6 Plus (2014) | 0.28″ | 189g |
| Apple iPhone XS Max (2018) | 0.30″ | 208g |
| Google Pixel 6 (2021) | 0.4″ | 207g |
| Apple iPhone 14 Pro Max (2022) | 0.31″ | 240g |
| Samsung Galaxy S22 Ultra (2022) | 0.35″ | 228g |
Having reached what I call “Peak Thinness” with 2014’s iPhone 6 and the ridiculous “bendgate controversey” that went along with it, I cheered for the internal battery. A Treo 700p is comically thick compared to the iPhone 6. The thought of putting a user replaceable battery into the iPhone for the first time gave me shivers as I began thinking about battery doors, clips, and a big ol’ chunk battery like the ones used in early smartphones.
But looking at the technical specifications of the smartphones listed above, they are already getting bigger, thicker, and heavier.
With this trend in smartphones, and I’ll speak specifically to the iPhone, might some of the world’s best mobile device engineers be able to simultaneously add features and accommodate an end-user replaceable battery? I think it could be possible in 3 – 4 years.
With the iPhone 15, the next iPhone that is expected to be released in September 2023, Apple is already rumored to be making slight body changes. iPhone 15, as mentioned earlier, is rumored to have a USB-C port, which is physically larger than Apple’s proprietary Lightning port. More powerful camera lens systems also necessitate a thicker body. Anyone else remember when the iPhone 4 would lay flat on its back on a table relative to the seesaw that is a recent generation iPhone on its back? Apple is also rumored to be making a switch from stainless steel bans on iPhone Pro models to the lighter medal, titanium, in an effort to offset weight from a larger battery.
We will see what pans out in September, but with a clear trend line that iPhones are getting thicker and heavier, it would seem there is some wiggle room to add hardware changes to support a battery that is easier to replace.
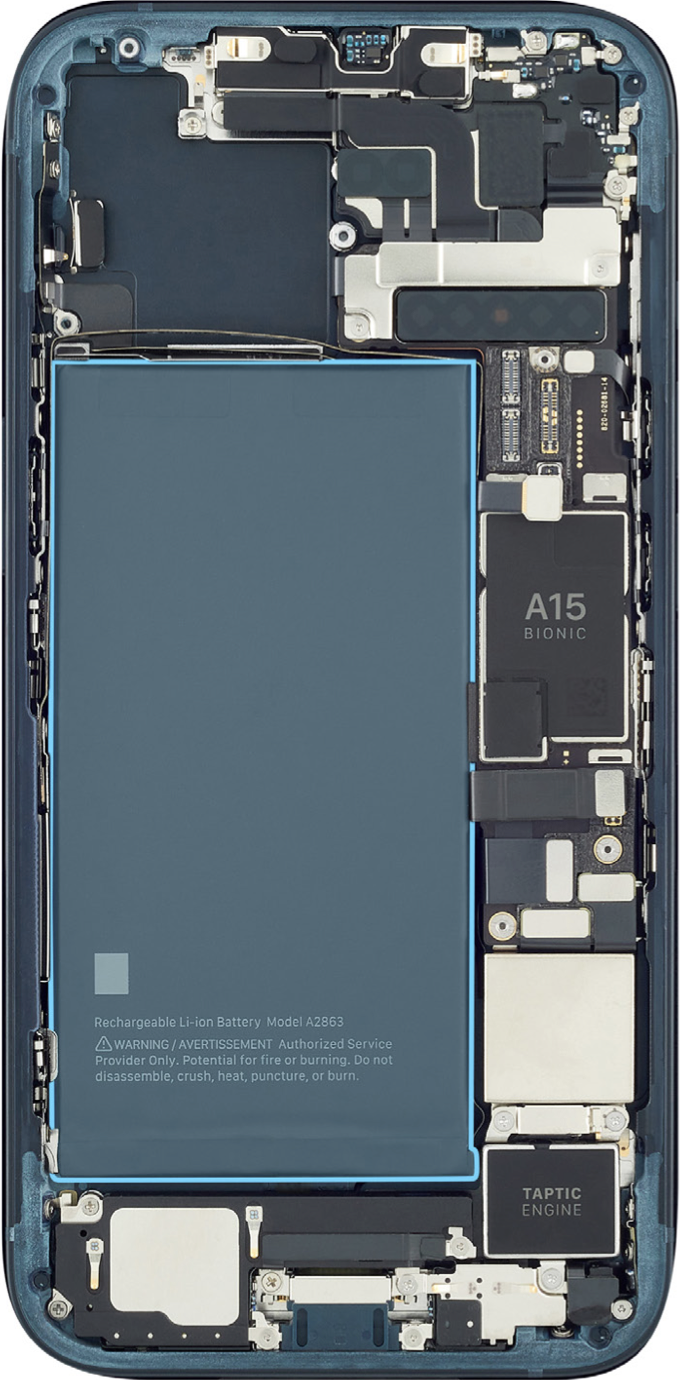
The inside of an iPhone 14 packed wall-to-wall, as can be seen in the photo (above) taken from the Apple iPhone 14 Repair Manual. To remove the battery, one must first remove the back glass to open the iPhone, a procedure that requires the use of a complicated desk mounted contraption. While I am not a mechanical engineer, making the iPhone easier to open seems like a good place to start to make battery replacement easier.
If Apple really doesn’t want to put a user replaceable battery in the iPhone, without the need for complicated equipment, they could just go back to lowering the price for battery replacements to make the repair more accessible to customers. The price of battery replacements dropped to a low of $29 in 2018 following customer lawsuits in 2017 relating to Apple slowing down performance of older iPhones that had aging batteries in them. In 2019, Apple raised battery replacement prices and did so again earlier this year, erasing all of the temporary price reductions put in place in 2018.
Wrap Up
Apple has shown that they can achieve amazing feats of engineering to deliver products that many of us want to buy. But as we will see with the first USB-C iPhone, sometimes that willingness to change and re-invent things requires a little help from world governments. My initial reaction to easily replaced iPhone batteries was likely overblown. With the right motivation and lots of engineering effort, I believe it is possible to keep iPhones from getting overly larger and heavier and still have a battery that is easier to replace than the current process.

This year as you celebrate our nation’s independence, it is a good time to remember that we are all Americans regardless of religious ideology, political affiliation, or who we choose to love. Our nation is much better when we are united rather than divided over petty “Us” vs. “Them” debates. On this 4th of July, it is important that we remember that there is no “Them”. It’s just “Us”, We the People.
Happy Independence Day! Now, stop reading the Internet and go eat way too much BBQ with your family and friends!
This fall, Apple will be releasing the next version of macOS Sonoma (aka Mac OS 14), a name which still looks better as Mac OS Sonoma. While we are waiting for Sonoma to be released later this year, likely in October, here is a list of the features that I am looking forward to.
New Screen Savers
Apple is taking the popular screen saves from tvOS and officially bringing them to Mac OS. Prior to Sonoma, the only way to get the stunning 4k Apple TV screen savers on your Mac was to use the Aerial screen saver. (There is also a Windows PC version of Aerial if, like me, you are forced to use Windows at work.) The thing that I like best about the new screen savers in Sonoma is that the screen saver will become your desktop wallpaper when you return to your Mac and start working again. Hopefully this feature will help combat “wallpaper fatigue” that I feel from sticking with a small selection of wallpapers on my Mac. Hey, Microsoft, any chance you’ll bring the Bing Wallpaper app to the Mac?
Video Conferencing
The new Presenter Overlay video conferencing feature really looks cool. I like the effect of using the Mac’s built-in webcam to put you in front of the content you are sharing, like a slide deck. To be honest, I don’t do many PowerPoint presentations these days, but I like that the feature is there. Apple lists Presenter Overlay as a feature exclusive to Apple Silicon Macs, but if this feature comes to iPad Pro which also has Apple Silicon M1 and M2 processors, there is a good chance that I will start attending Zoom and Teams meetings from my iPad instead of a Windows PC.
Along those same lines, I like that Apple has added composition controls for the Studio Display webcam and an iPhone mounted atop of a monitor in Continuity Camera mode. The lack of controls felt like a miss to me and having them in Sonoma makes the feature feel more complete, in my opinion.
Password and Passkey Sharing
There is a reconning coming for passwords and third-party password managers in general. While I was able to get one other family member to use strong passwords and store them in 1Password, letting the less tech savvy people in my family to use strong passwords and a password manager has been, to say the least, challenging. With Apple’s support for passkeys and shared passkey sharing I am looking forward to an easy, fast, and secure way to share family login credentials so that others don’t have to think about managing them. Sharing a strong passkey with my family, presumably via iCloud Keychain, should be a good balance between ease of use and security.
Search Filters in Messages
OMG, yes! When dealing with my kids, now young adults, everything is text messages and screen shots. Trying to find a needle in a haystack is easier, in comparison, to finding the one-line text message with the information that I suddenly need to deal with in a message that was sent weeks ago. I am looking forward to being able to narrow search results quickly with filters.
PDFs and Notes
Clearly, I have not been using the Notes app to its fullest potential. I never thought to stick a .pdf file inside a note. Files live in the Finder on my Mac or in Files on my iPad Pro. Call me old school, but I still organize files in folders using the physical desktop and file cabinet metaphors from the early days of GUI computing. At best, I might stick an iCloud Drive web link inside a note. But with the new PDF support being built into Notes, you will be able to open and view .pdf files attached to a note. Additionally, you will be able to annotate the .pdf file. And, if you need more editing features, the ability to use the Share function to send a Note to Apple’s Pages app is really interesting. I don’t think I have any notes that have a lot of text in them that I would need to send to a word processor, but then I think about kids today and how they might be using the Notes app for schoolwork. There have been times my kids would write papers in Google Docs from their iPhones during study periods so that they would have less homework to do later. This is not how I would have done it, but the power of computing is really in the flexibility to work how and when you want. With that in mind, the new .pdf, Notes, and Share (with Pages) look like nice quality of life improvements.
Keyboard, AutoCorrect Improvements, and Inline Predictive Text
One of the stories that I found interesting about the creation of the original iPhone was Ken Kocienda’s recounting of how the iOS keyboard software was created in his book, Creative Selection: Inside Apple’s Design Process During the Golden Age of Steve Jobs.
With Mac OS Sonoma, and presumably the iPhone and iPad as well, autocorrect will show a corrected word with an underline. If you want to revert back to the original work, tap the underlined text and it will revert. I think that this will be a help when typing acronyms and terms used in business or social communities that are not in the keyboard’s dictionary. Predictive text also has the potential to cut down on typos, one of my biggest issues when using the iPhone keyboard. With predictive text, you can tap the space bar to auto fill the rest fo the word or sentence. I originally resisted this feature in Outlook and Gmail, but I have come to see it as a tool to catch and remove typos rather than a way to be lazy typists.
Gaming on Mac
With Game Porting Toolkit and Game Mode, Apple appears to be making a concerted effort to bring quality third-party games to the Mac OS platform. I sort of feel like Charlie Brown trying to kick the football that Lucy is holding. Apple has made attempts to get behind gaming on iOS/iPadOS/MacOS for years now and it goes nowhere. Even without a signed and notarized document from Lucy, I’m feeling pretty good about the possibility of AAA gaming coming to the Mac.
Tom Warren over at The Verge posted an article in early July that gives a good overview of what the new Apple tools are capable of. In short, the Game Porting Toolkit is a software development tool that allows game developers to run their existing Windows games on Mac OS so that they can see how they perform and then figure out what work is needed to fully port and optimize the game for Mac OS. Early results look promising.
It has been a long time since I have considered myself a serious gamer. Aside from playing Halo games on my Xbox 360 (the most current console I own), it has been well over 20 years since I played a triple AAA game on my personal computer. I don’t want to spend the time or money to build or buy a dedicated gaming PC and early-stage RSI issues are preventing me from holding game controllers for any long periods of time. Being able to play Halo, Medal of Honor, or Call of Duty – natively – on my Mac Studio would be a great way to scratch and itch, then go back into a months long break from gaming.
What’s Next
There are a lot of big and small updates coming to Mac OS Sonoma this fall. Take a look at the macOS Sonoma Preview page on Apple.com to find the features that you are looking forward using later this year.
The 2023 Mac Pro is a massively powerful Mac, however, anyone seriously considering buying this machine for work needs to understand what it can and can’t do for them.
With the release of the new 2023 Mac Pro earlier this month, Apple completed their CPU transition from Intel CPUs to their own in-house designed Apple Silicon chips. To call Apple Silicon chips “CPUs” is a bit of a misnomer as these chips really are whole System on a Chip (SoC) designs encasing the CPU, GPU, RAM, Neural Engines, Secure Enclave, video encoders and more. From my “old man” view, the Apple Silicon is like the whole system board, or motherboard if you’re from the PC camp, all rolled up into a single chip on today’s Macintosh computers. (Side Note: The Apple II series system board was referred to as “the circuit board” in Apple documentation in the late 1970s into the early 1980s.)
The transition from Intel to Apple Silicon was originally stated to take two years by Tim Cook. Having lived through the PowerPC and Intel transitions already, I was not surprised with a two year timeframe. Apple is a company that knows how to do this sort of thing very well. The transition, clearly derailed by a global pandemic, ended up taking three years. Overall, not to bad, in my opinion. However, by the end of Apple’s March 2022 keynote address, the 2019 Mac Pro was already started to feel past it’s sell by date when John Ternus would hint that more news was coming soon about the Mac Pro. As it turned out, it would be another 14 months before the new Apple Silicon Mac Pro would begin shipping to customers. Years from now, I would love to read about what happened to this version of the Mac Pro. Clearly something went wrong and the project needed to be recalibrated. Perhaps, the design of this machine will become an Apple University lesson.
The 2023 Mac Pro, now shipping to customers, is Apple’s highest of high-end machines. It comes equipped with the highest of high-end SoC chip to date: the M2 Ultra. And a price tag to prove it. The Mac Pro starts at $6999. If I was able to use Uncle Tim’s Apple Card, the Mac Pro configuration I would order (base M2 Ultra, 128GB RAM, 4TB SSD) comes in at $8,799 or $733/mo for 12 months. By comparison, my M1 Pro Mac Studio was a bargain at just $2,999. Apple also announced the the M2 Max, which is available in updated MacBook designs. These new chips join the base M2 SoC released in January.
On the outside, the new Mac Pro looks almost exactly the same as the previous Intel model, which is completely fine in my opinion. I’m sure Apple chose to re-use the exterior case design as a means to recoup design costs. I like the idea of having expansion bays so that you can stuff it full of expansion cards. Just like I used to do with my Apple //e. But that’s my old man is showing again. I meant, my PowerMac G4. Whoops, I did it again.
Unlike the previous Mac Pro, the 2023 Mac Pro allows you to add cards to it, as long as those cards aren’t the Afterburner card or a third-party graphics card. The former is now supercharged and baked into the M2 Ultra chip. The latter just isn’t an option because Apple thinks that their M2 Ultra GPU cores are just as capable and are “on package” in the SoC. You can discuss amongst yourselves about whether or not third-party off SoC package video cards could or should be supported. If you’re looking for high-speed networking or lots and lots of internal storage, the Mac Pro is for you.
The Apple Silicon transition was announced in the summer of 2020 during that year’s WWDC. In November 2020, Apple released the first Macs with the M1 chip. That year, I traded in my 15-inch 2016 MacBook Pro (the one with the really loud butterfly keyboard) for a 2020 13-inch MacBook Pro (sans butterfly keyboard). That MacBook should have been renamed “PowerBook” in my opinion because it was way faster than my MacBook Pro and 2015 27-inch iMac.
The 2023 Mac Pro is a power house, for sure. The Mac Pro has become, in my opinion, a show piece. It demonstrates what is capable with Apple Silicon and shows off the raw power of the architecture. As an average Mac user, think of the Mac Pro more like a concept car or an extremely expensive luxury car. Unless your or your organization needs all of the compute power in Mac Pro. Then, it becomes a day-to-day business tool. Apple likes to talk about it’s Pro hardware in terms of audio and video creative work, however, the Mac Pro platform can be used for other high-end needs including engineering and design, big data analytics and academic research, machine learning, and, of course, application development. Being a casual observer, the new Mac Pro looks like it it has all the number crunching capabilities of Unix/Linux and Windows system and more. Examining the Mac Pro more carefully, one can see that it’s greatest strength, the unified architecture of the M2 Ultra, is in some ways, it’s greatest drawback. Because of the unified CPU/GPU/RAM architecture of Apple Silicon, it is impossible to add more RAM or upgrade the GPU. Moving RAM or GPU functions external to the M2 Ultra SoC will decrease overall performance of the system. Ed Hardy, writing for Cult of Mac, explains:
“The weakness of the architecture is that individual components can’t be upgraded. It’s not possible to add more RAM to the SoC, or swap out the GPU.
While it’s theoretically possible to add more RAM off the chip, this would not take advantage of the significant speed boost that comes from memory built into the chip. In short, this add-on RAM would slow down performance, the opposite of the reason why it’s being added. That’s likely why Apple doesn’t offer the option.
The same problem affects external graphics processing units, called eGPUs. Apple used to sell these for Intel-based Macs but has since stopped because they aren’t compatible with the M series.”
And there in lies the conundrum of the 2023 Mac Pro. It’s raw performance comes from the specialized M2 Ultra SoC. At the same time, that same SoC performance is the thing that prevents the addition of more RAM and GPU video cards. While I am sure that these limits do limit the already small pool of customers for the Mac Pro, clearly Apple has optimized the machine for a specific type of customer. When deciding on purchasing a Mac Pro for work, a prospective customer will need to weigh out the options for faster compute vs the need for large data sets in RAM vs the raw horsepower of GPU processing cores.
I am glad that the Mac Pro exists as the very top of the Apple line up. Almost no one should buy this machine as consumer needs will be readily met by other less expensive Macs.